Science in the City

Oct 27, 2018

The Guide to Engaging Learning About Potential and Kinetic Energy

Making Potential and Kinetic Energy Engaging!

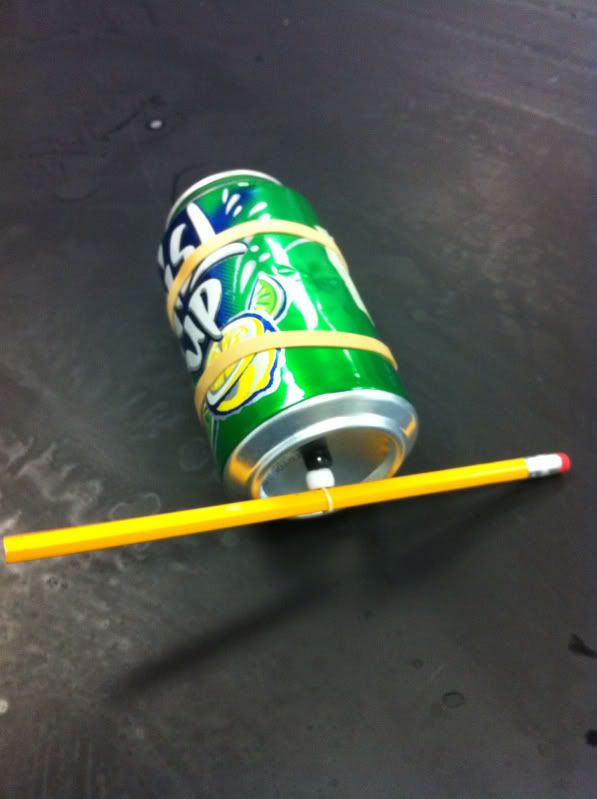
One of my most popular resources to designed to teach about potential and kinetic energy, but making a car out of common household materials (an empty soda can, a pencil, rubber band, and paper clip).

When students create these cars, there are some questions or places where they get stuck. With a little bit of preparation, this can be a simple and successful project for students ranging from upper elementary to even high school students. I have had students make this car in the class and then go home and make another one. Here is a close-up view that I took of the car in action!


Assembly Directions and Pictures

Here is a tip!  Use a hammer and nail or drill to pre-punch the holes in the bottom of the can. That is really the only tricky part and will save a lot of trouble.

Here are some close-up pictures of the cans assembled.  I hope this helps you visualize how they go together.
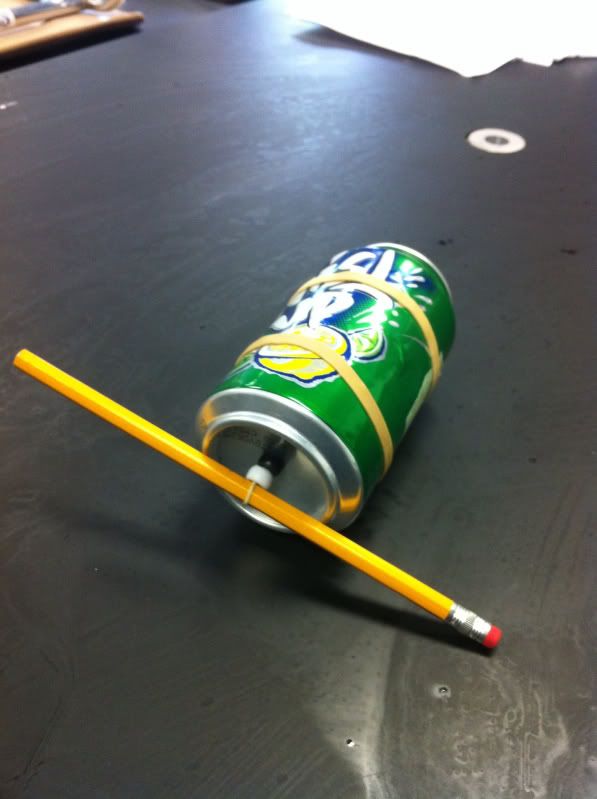
The completed car!
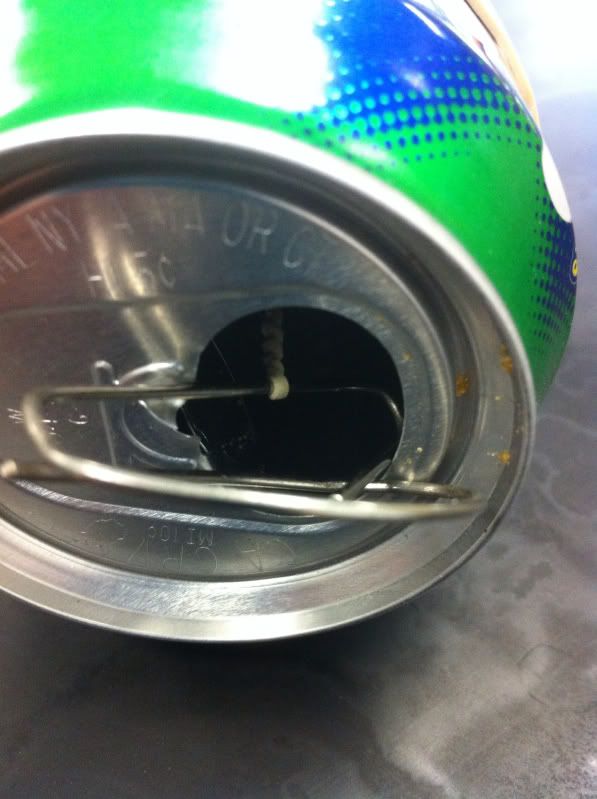
This shows how the paper clip anchors the rubber band. 
The beads simply give the pencil and rubber band more room to rotate. 


Further Inspiration and direction

In case you are looking for more inspiration, or an engagement video to get your students started, here are a couple other similar ones that will help you get started. This one is very similar and comes with complete assembly directions (this is not me in the video).

A slightly different, but similar racer made with a spool! This would be a great one to show students as an extension, or pre-activity to engage them and get their attention!

Extensions

If you are looking to extend this further, this is the perfect lab to practice experimental design. Students can choose one variable to test (number of rubber band twists, number of rubber bands, the size of the pencil, or countless others) and determine how it affects the travel distance or travel speed. 

Students can race their cars and have a competition.  You can set up a starting and ending line.  They will love this!!

If you want to try this activity in your class, with complete written directions and summary questions, check it out here.
The Guide to Engaging Learning about Potential and Kinetic Energy

Oct 13, 2018

How to Smoothly and Successfully Run Stations

How to Smoothy and Successfully Run Stations

I think we can all agree that we want our students engaged. They like to move around, and they have short attention spans, but we need to teach a lot of content in a short time. We need to keep kids engaged and have ways to show the information in different ways efficiently. We need times that some students can work independently, while we work with other students in small groups. 

I have faced this same problem, and I want to share with you one of my best strategies to overcome this problem. I teach in an urban district, with a wide range of abilities in one class, and often a lot of students that have lower reading levels, are ELL students or are special ed students.

One of my favorite methods of teaching is to use stations because it helps keep the students engaged, keeps them on pace, and gives me a chance to work with some students or groups individually.

My Five Biggest Tips for Using Stations Successfully

  1. Set a timer - I like to keep a timer running on the board when I am doing stations. It really helps keep the kids (and me) focused and on track so that they get done what they need to do in the designated time. It is easy to remind them when their time is halfway up, or when they have one minute to finish up. You can easily use a timer right in Google on the smartboard, or an extension like One-Click Timer or many others. Tip: Be sure to plan a minute or 2 to reset the timer and transition. 
  2. Make a map or clearly mark the stations - You can use my printable Station Signs, make your own, color code the stations, or make a map on the board but make sure that the stations themselves, and the order to rotate through them is clearly marked for your students. It will save a lot of headaches for you and them if they know where to go. Similarly, if you can, try to keep the rotation consistent the next time you do stations so that it is easier for students.
  3. Pre-determine your groups - There are lots of ways to determine groups (randomly, by interest, by ability so that you can work with one group, and many more). Any of these are fine, but put a little bit of thought into how you want to group students to enable the activity to work the best, and for you and the students to get the most out of it. Be prepared with how you are going to place students into groups, as well. Either have a prepared list, have them draw cards on the way in for random, etc.  
  4. Make the stations a mixture of hands-on and independent work - It will quickly get too hectic if all of your stations are doing mini-experiments or hands-on activities. I like to make this only at one or two stations. This allows you to spread out your materials, and better manage a smaller number of students who are doing a more active lesson. For example, I may have 3 stations (2 of each for a total of 6). One is hands-on, one is reading the background information or watching a background video, and one is graphing an analyzing their data. Similarly, if have a limited amount of technology, you can have a technology activity or video to watch at one or two stations, reading at one, and vocabulary/writing/labelling diagrams at another station. 
  5. Plan for the timing - It can get tricky when students at one station are done long before others. There are a few ways around this. (1) You have to be really sure that the stations will take about the same amount of time, within a few minutes. (2) If this is not feasible, or is not working out, have something ready that they can work on during the downtime. This could be as simple as starting homework. It could be ‘extra credit’ of some sort. You want to avoid them getting ahead on the next station. I like to keep the materials at each station, and have students rotate with an answer sheet, to help the timing go more smoothly.
Stations can be a fun way to keep students on-task and engaged, and for them to have a sense of success, as they finish a task in perhaps fifteen minutes. They know what is coming next, and they get to see the pieces come together. Both my students and myself have had a lot of success with using stations in science class, and I want you to be able to experience that as well.

If you try out stations in your class, feel free to comment below, send me an email, or join me on social media to let me know how they go, or what your tips are.

Sep 29, 2018

Top 5 Takeaways From the Hive Conference

A brief summary of top takeaways from the Hive Summit, Summer 2018


What is Hive Summit?

If you’ve never heard of Hive Summit before, it’s described as a free 14-day virtual educational conference. You sign up online, and ‘attend’ by watching and listening to various speakers on innovative educational topics.

If you missed it this year, I would definitely recommend attending in the future. You can find out more, and sign up at https://hivesummit.org/

Who Presented?

The presenters were some of the biggest names in innovative education at this point, with a few notes:

  • Dave Burgess - Share your ideas with others, and incorporate others’ great ideas into your teaching! You have access to great resources online to share ideas.
  • Rick Wormelli - A teacher is bound to ensure that students learn, and we can change our grading systems to ensure that grades help encourage growth.
  • Sarah Thomas - Connection and Professional Learning Networks are a fantastic resource. These can be digital or face to face, and can change your path; there are others seeking what you have to offer.
  • Rabbi Michael Cohen - creativity is critical because everyone is a ‘designer’ for someone, and creativity has to be a recurring practice.
  • Matt Miller (Ditch that Textbook) - Use educational technology to fit the tasks, and change traditional tools to be used in ways that are relevant to collaboration. We, as teachers, need to take risks and use technology to develop empathy and connect with others.
  • Michael Matera - Gamification is a way for teachers to overlay a game on top of content and instruction to allow collaboration, challenge, and to help increase engagement.
  • Tara Martin - Be real and be a risk-taker. Encourage change as a means of growth, and be a leader. This makes the collective whole better.
  • Joe Sanfelippo - We are better together in education. Share out the good things that happen in your classroom, and place value on others trying things outside of their comfort zone. Make connections, and show that you care!
  • Carrie Baughcum - sketchnoting is a new form of note-taking; it focuses on getting your ideas down on paper and connecting your ideas, as well as reflecting.

Main Takeaways!!

I took part in all the sessions, and it is almost impossible to condense 9 presenters into the Top 5 Takeaways, but I’m going to try. As I listened to and read all of these sessions there were several themes that kept jumping out at me.
  1. Take Risks - So many of these presenters talked about taking risks and stepping out of your comfort zone. This is where the change happens! 
  2. Collaborate - We are (hopefully) all in this for the students, and we don’t do our best work alone. We all have good ideas and individual specialties, and it is only through sharing our ideas out, being proud of what we are doing and working together with others that we can integrate those ideas and see the biggest benefit for students. Whether this is within your school, your region, Twitter, Facebook groups, Listserv, or any other PLN, use it!!!
  3. Be Unique - Don’t be afraid to be yourself! Some people are artistic, some are great at communication, some are great at organization. Don’t be afraid of that. Kids are unique too, and we need to build on that and find ways for them to learn more individually.
  4. Be Creative! - Creativity doesn’t just mean artistic, but it means being able to explore/experiment, and design. These are critical skills, for both teachers, college students, and workers.
  5. Reflect - as we try new things and grow, it is so important to reflect, look at what went well, and look at where to improve.
And remember, good practices for teachers are ALSO good practices for students! We, as teachers, are in a position to teach our students many of these same skills which will serve them well in almost any career, after graduation, and prepare them to be successful as they go out into the world!

So often I think we get focused on students learning content, but learning these skills of collaboration, reflection, creativity, and risk-taking are so important as well. Our classrooms can be a place of real, authentic, engaging learning where students can practice these skills.

Further Resources

For further information go to www.hivesummit.org and learn how to connect with each of the presenters and get more information!

***Bonus Starting Saturday September 29th through Sunday October 7th, the Hive Summit videos will again be available for a limited time. Sign up at (--->HERE<---), and don’t forget to tweet out what you’re excited to revisit using the #HiveSummit hashtag and/or by tagging @Hive_Summit.
Related Posts Plugin for WordPress, Blogger...