differentiationScience in the City: differentiation
Showing posts with label differentiation. Show all posts

Jul 29, 2018

Sharing Feedback on Google Assignments

Sharing Feedback on Google Assignments

When students are doing an assignment in Google Drive one of the difficulties maybe how to best get their scores and feedback to them. This is especially true if you are doing a series of smaller assignments, such as warm ups.


A few general ways

There are a few general ways to do this and I will give you some tips on each one. 

  1. Use a learning management system, such as Google Classroom (probably the easiest), Schoology or many others. 
  2. Give them feedback directly on the document using the comment tool 
  3. Create a spreadsheet or PDF document that lists grades by ID number. There are pros and cons of each of these of course.

In Google Classroom

In Google Classroom it can be pretty self explanatory to grade an assignment there, and give feedback. Then those grades will likely have to be entered into your gradebook, unless your school has a way of importing them.

Sharing a Single Slide and Giving Feedback

I have sets of warm-ups that are a set of Google slides that cover the whole unit. For example, here is a set that I have on weather.


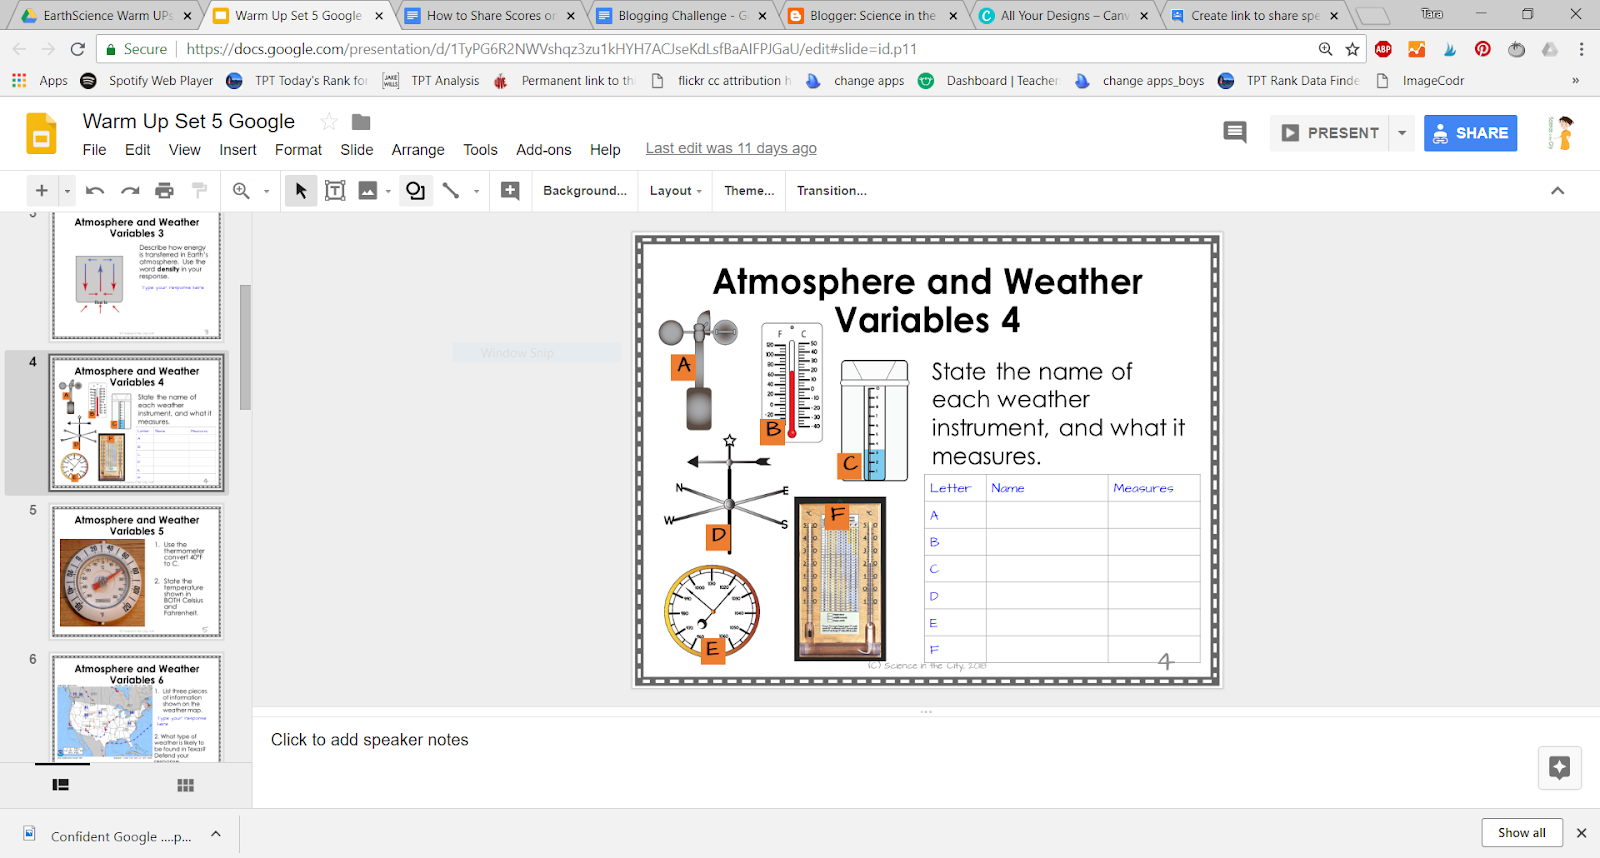
If I want to share only one slide with a student that day, I would do the following steps:
  • Copy that slide to a new presentation
  • I would share with them through either Google Classroom, or by creating a force copy link. 
  • You can see what the student sees by clicking here.
  • The student then can type directly into the slide, and then either submit through Google Classroom, or share back with me. For me to be able to comment, they must share with either ‘can comment’ or ‘can edit’
  • It then becomes very easy to comment on their work, from my computer. More information on using comments for student feedback is available here.


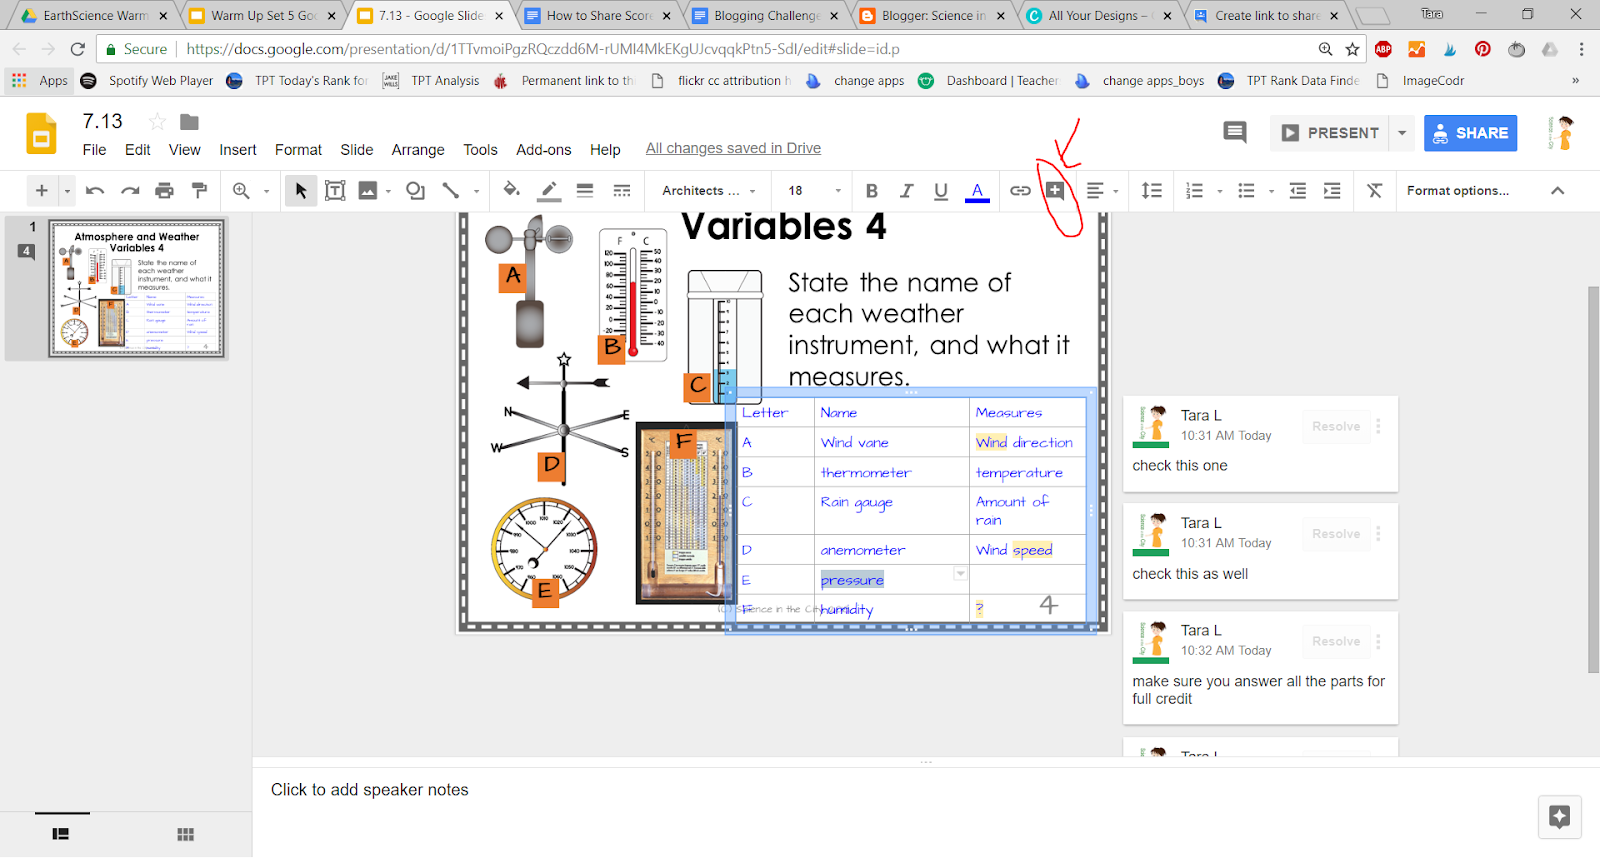
If I do it this way, I often keep a piece of scrap paper next to me to record their grades, or another window open to record grades as I go through, if I am not using Google Classroom.

Google Forms and a Spreadsheet

I discussed how I use Google Forms and create a spreadsheet by ID number in this post.

Other Tools and Tips

There are other tools as well, which I will touch on just briefly.
  • If you are often entering repetitive feedback, and want to have a bank of comments, feedback, and even stickers that you can use, take a look at this article on using Google Keep for Quick Student Feedback

  • If you (or your students) would find it helpful to give spoken feedback, look into the Kazienza app. It is a very simple Google Chrome app that enables verbal feedback.

  • Only in Google Docs (not Slides, etc), there are several tools for rubrics, which can also simplify the process of grading and giving feedback to students. This can also be done within Google Classroom. And lastly, one more Google Classroom rubric hack.

I hope that these tools help make your digital transition a bit easier, as you find more effective ways to manage your grading and give feedback to your students.


Jul 15, 2018

What do your students need to know and be able to do to be confident using Google Drive?

What do your students need to know and be able to do to be confident using Google Drive?


Tips and strategies, as well as helpful links to prepare your students to be successful as they start using Google Drive and take full advantage of the benefits

Benefits of Google Drive

Google Drive is a great tool and it's easy to use, but students need to be comfortable and confident for it to be successful. Students can store any file in Google Drive, access them anywhere, share with others, work saves automatically, and they can search for their work.

How to Best Prepare Your Students

However, to take advantage of these benefits, students need to be comfortable with Google Drive. What they need to know will really depend upon the assignment that you want them to do but some basic skills and facts that student should know include the following (I am including a link with a good summary to each):

  1. Understanding sharing settings 
  2. Understanding how to search for and save (organize) files
  3. Basic formatting tips -- the G Suite Learning Center is a great resource, even with printable PDF’s that would be great to put on tables, or hang around the room! I am linking here to the section on Docs. 
  4. How to make a forced copy (this can also be done through Google Classroom
  5. It may help students if you make a template that they can fill in. This takes away a lot of the fear of staring at a blank document. You you could give the option of using a template. Some students will want to be creative but not all. I often make a template with a forced copy link as in #4. Another option is to make a template, as described here
  6. Think about the specific assignment that you want them to do, and what skills will come in most handy.

When and how should I teach these?

I am not a big fan of doing a big intro, but a quick mini lesson, or even a few steps at the beginning of the assignment that will teach and review the necessary skills. These assignment specific skills might include things such as:
  • inserting pictures 
  • formatting 
  • inserting links 
Be patient as students are learning new technology. We often think that they are ‘born with technology in their hands’ and that they already know all of this, but in many cases they do not. They may know some technology skills, but not necessarily the academic ones we are trying to teach them. Work with your students and you may learn something from them too.

Jun 17, 2018

Easy Ways to Assess Your Student's Earth Science Knowledge

As we near the end of the year, I want to share with you a new resource that I have been working on. It is a growing bundle of Earth Science Warm Ups or Formative Assessments.

Easy Ways to Assess Your Student's Earth Science Knowledge

I have written quite a bit already on how I use warm ups in my class, and how important I believe formative assessment is, for both the teacher and students. I also have several emails on the topic, so feel free to sign up for my email list, either by clicking here, or the sign up box on this page, if you haven’t already, to be sure you get those.

Some of my formative assessment posts:
With these in mind, I am most of the way through creating a year long set of Earth Science formative assessment task cards. They can be really useful to you for a variety of reasons:

They are aligned to my curriculum guide, and student learning objectives, which are also aligned to New York State.

They are available in different formats:
  • Google Slides to project on the board, if you want to have students record their answers on separate paper.
  • Interactive Google Slides so that students can type directly onto the slide, or move pieces around to answer the prompts.
  • Printable PDF’s so that they can be used as task cards.
  • Instructions are included to use with PowerPoint, and to use with several other digital platforms.
  • These have an emphasis on understanding diagrams and key vocabulary.
  • These work work well as daily warm-ups, tickets out, review activities, task cards, even an early finisher activity. Task cards have so many uses.
  • They are a full year set of 200 task cards, so you can use one every day, or pick and choose how you want to use them and have a big selection. 
I don’t know about you, but it can be hard to consistently come up with questions. It is a huge time saver, and sanity saver to have a bank of questions ready to go. I hope these Earth Science Formative Assessments are helpful to you.

If you have specific questions, or suggestions, please feel free to comment or email me!

Mar 18, 2018

How to grade differentiated assignments

Whenever there is discussion of differentiation, or creating and using differentiated assignments, one of the biggest struggles that comes to my mind, and I think for many other teachers, is how to grade those assignments fairly (and hopefully without creating excessive work for the teacher).
Tips, strategies, and reflective thoughts about grading in a differentiated classroom

It can be overwhelming to think about how to grade all these different assignments or how to make sure that students are fairly evaluated when they're given different assignments here are a few ideas:

First of all, keep in mind that in some cases differentiation is simply another way to learn the content, or practice with the content, and that it does not need to be graded separately. It is a different way to arrive at the same goal and only feedback or formative assessment may need to be given.

If you do decide to grade the differentiated assignment, here are a few suggestions:

  1. You could create a checklist and then simply add or subtract a few items on that list from the differentiated assignment.
  2. Create a rubric so that whichever format of an assignment students are doing they need to meet the same general criteria but they might meet it in different ways.  The rubric should be focused on the content and the goals of the assignment, not the format.  Here is an example of that. Along with rubrics, here is a more in-depth discussion of something called the “slide rubric” which allows students to show growth, and to show more differences between levels on the rubric. It would take a bit of work to set up, but be easy to score when finished. 
  3. The differentiation may be scaffolding that is provided within the assignment, in order to reach the same goal. So, it may not be visible in the final grading.  The final assignment that is turned in may be the same, but it may have some scaffolding built in. 
  4. If it's a small assignment, you might want to consider giving a check, or a completion grade for partially complete, incomplete, or not done scale, given whatever their assignment directions were.
  5. Assessment could also focus on progress monitoring, such as showing growth, depending upon the needs of your classroom.  I think elementary classrooms do a much better job at this than secondary.  We have a lot to learn from them!! 
As you are thinking about this, remember that 

Grading should ultimately reflect the standards so you're grading should come back to what are the key points that students need to know did they demonstrate their understanding?? Maybe they demonstrated them in different ways but if they sufficiently demonstrated that they know the material that should be the focus of their grading. In other words, the grading is tied to the content of the project, not the format of the project. This is discussed further in this webpage (a very thorough look at differentiation, with a discussion of grading).

If you are using technology, Google Classroom has great options for differentiation as well, that you should be aware of! This article doesn’t specifically address grading, although it touches on it, but it is a great description of using Google Classroom to differentiate, and may give you some great ideas!

As far as a more theoretical perspective, here is a great slideshow from Carol Tomlinson (Differentiation Guru) on grading. She outlines 6 principles on grading that absolutely apply to grading differentiated work as well, and help put things in perspective.

How have you differentiated and graded those differentiated assignments in your classroom? I would love if you would share your experience and your ideas with us either in the comments here, or in our Facebook group.

Mar 4, 2018

Help Your Students Struggling with Vocabulary

My Students Know the Content -- Why Do They Test So Poorly?

You may have been taught and prepared to teach your students the content. You have spent time doing that, and you think they understand. Then you give them standardized test questions and they bomb, they shut down, or they keep calling you over very confused. How can this be? You thought you taught them this information?

Strategies and resource to help students with tier 2 vocabulary often needed for test questions

Sometimes it's not the content words that students are struggling with, but instead it's the non-content vocabulary or the Tier 2 vocabulary. In other words, they know the content but they don't understand the questions or they don't understand the reading passage. If they don't really understand what they are being asked, they can't begin to answer the question.

So many of our students don't have the background knowledge and vocabulary, they may be ELL students or they may just not have a lot of academic vocabulary.

So what can we do about this? 

We need to teach our students this vocabulary! And to successfully teach vocabulary students need practice with those words in several different ways. Of course, this seem like an overwhelming task try to bring our students up to grade level with their vocabulary during science class or another content class but it doesn't have to be as difficult as it sounds. I have written about this before, but I was asked for more specifics on how I implement that strategies and vocabulary that I use.

Here is what I have done

Here is what I did to work on tackling that problem and I'm hoping it will help you too. I went through our last couple years of State exams as well as a few other resources and I compiled a list of Tier 2 vocabulary words. I also asked my students, as we did practice questions throughout the year, what words they didn't know or were confusing and added to the list. I also shared resources with a few other teachers. At that point I had a very good list of words.

I use those first for warm ups. Here are the basic steps that I follow:

  • I took a word a day, usually, and I gave them a sentence or a picture to infer, or comparison to another word. 
  • Then I had them try to conceptualize and infer what they thought the definition of the word was. 
I would usually project these on the board, and have students record their answers. This could, of course, be done in a Google Form, slide, on paper, or many other formats that fit with your classroom routines. This did two things at once: (1) they got to practice the skill of inferencing and using context clues to figure out the meaning of a word that they didn't know, (2) they also started to get familiar with some of these words.

I would usually do one word a day so five words a week and then after the end of the week or at the end of 2 weeks we would have a little quiz on those words. Sometimes it would just be a matching quiz, sometimes question that had one of those or a reading passage that had one of those words so they could see it in context.

An example of a strategy to help students with tier 2 vocabulary in the classrom

After awhile, it was amazing, students started to learn some of the words but more importantly they started to gain confidence. When we do test questions where they would run across those words I would start to hear things like “Oh, I know this word!” “This is a word we just did last week.” They were not longer foreign, but were familiar instead. Even if they didn’t remember all the definitions, the vocabulary had lost its power to be scary!

What's the Next Step

It's so important that these are integrated in throughout the year and the students practice using them so that it's not an isolated thing. To facilitate this, when we did stations for other topics (I do a lot of stations in my classroom) I usually throw in one extra station to focus on those vocabulary words. It might be the same thing as what is on the board, as a review, but a few task cards printed out. It could be matching up words and definitions either on paper or on Quizlet. Sometimes the station would focus on vocabulary more subtly because it would ask them to write a test question using some of those words (maybe with a word bank or sentence stems). It's so important that they see these over and over again so that they lose their fear and mystery.

Where Can I Find Out More

More strategies are outlined in this great article 8 Steps to Tier 2 Academic Vocabulary in Your Students and here Enriching Academic Vocabulary: Strategies for Teaching Tier Two Words to E.L.L. Students.

This is something that you could easily implement on your own but if you would like to make it easy, my complete set of over 200 words (more than enough to use one every day) they're available here

set of task cards to help students with tier 2 vocabulary

Here are a few of the pieces of feedback I have gotten on this resource.  I hope it can be helpful to you as well!


I also wrote more about this strategy in these other posts, here, here, here, here, and here.

Strategies and resource to help students with tier 2 vocabulary often needed for test questions

Feb 4, 2018

Free, Engaging NGSS Aligned High Tech Resource For You

Free, Engaging NGSS Aligned High Tech Resource For You


If you are looking for a new and different, technology-rich activity to introduce students to a career in science, increase literacy in science, and practice using claim-evidence-reasoning (CER), I want to share a resource with you.

**Disclosure: This is a sponsored post, but all opinions are genuine and are my own.** #sponsored

I was asked to write a sponsored review of the UL Xplorlabs Fire Forensics Module, and I am very pleased to share it with you! I also asked my sixth grade son to go through it and give his feedback.

Xplorlabs has made two modules that are free, STEM-focused, and NGSS aligned. They have supplementary hands-on investigations that could be used in the classroom, and tie to both safety and real-world problems. I looked specifically at the Fire Forensics Module and found it very engaging, and found it to provide a fun, interactive online environment for students to learn from real scientists.

What is included in the Fire Forensics Module?

The Fire Forensics Module is an interactive web-based lesson that teaches about fire, but also teaches about building an evidence-based claim as students go through the process of being a ‘fire investigator in training.’ It is “designed to provide students with the understanding of fire, fire dynamics, and fire behavior so that they can read a fire scene and build a claim for the fire’s location of origin and cause.” It includes videos, embedded practice quizzes, a model where the students and instructors analyze the fire together, and then a culminating activity where the students analyze the fire themselves, from evidence, and then submit their analysis along with claim, evidence, and reasoning to their teacher or print it out.

The module is very well scaffolded, with short (1-3 minute) videos from current fire investigators, education on the fire itself, and on the tools used for investigation. There are interactive activities and self-checks, and also supplements hands-on activities that can be used (but it works fine without it as well).

The content covered focuses on the basic science of fire, and the fire investigation process itself, but they also use this as a lens through which to teach and practice claim, evidence, reasoning, and the scientific method. Depending upon the extension activities chosen, you could also use this to practice graphing.

As students work through this module, they are first introduced to the job of fire investigators and why it is important. They enter the ‘investigator’s academy’ and learn some background about how fire is defined, how fire develops, and how it behaves. They will then go through a ‘model’ fire in the lab, and then investigate a case and build a claim, based on evidence and reasoning.

What’s great about it?

I really liked this module, and would not hesitate to use it with students. The videos are short, engaging, and fast-paced. The website is very professional and easy to navigate, while still being kid friendly. There are self-checks built in and interactives to keep students on track. If students miss formative assessment questions they are given explanations, and then try the questions again before moving on. I really like that it integrates the career piece. This can be so important for students to just see what else is ‘out there’ and available to them as a career.

The whole module builds on itself seamlessly, and integrates supplemental activities if you choose. However, you could easily use only part of the module, and could include or omit as many of the extension activities as you choose. If, however, you do choose to include the extensions, they come with great teacher instructions, including materials list, roles, etc.

The whole module culminates with students solving a ‘case,’ establishing their claims, using evidence and reasoning to support it.

Feedback from my own middle schooler

This activity is geared towards middle school. I have taught middle school, but at the moment I’m teaching high school. I do, however, have a 6th grade son, so I asked him to go through at least some of the module and give me his feedback. He completed the first four sections during some free time. He liked it so much that he wants to go back and finish it, or check out the other module that they offer on his own! But he really liked the short videos, and the interactive charts in section 2 where you could modify the components needed for the fire and see how the fire changed (visually). He said he learned that the amount of heat, oxygen, and fuel changes how big the fire is, which he didn't know before. He thought all three had to be present, but didn’t know that the fire would change if there were different amounts.


He found the website easy to follow and thought the directions were very clear. He said he learned a lot, but the most interesting takeaway was that he had no idea there was such a job as a fire investigator. He said he could see his teachers doing this in science class, or even on a day where there is a sub because the students would be able to go through independently.

When would I use it?

As a teacher myself, I thought a lot about when I would use this activity. Some activities I’ve seen in the past are ‘fun,’ but really don’t fit with any curriculum. I think this one does, however. If you were teaching a forensics course, it is a natural fit, as well as a unit about careers. However, I think it would fit as a way to practice CER and using evidence. Because of the extension activities, it would be a good way to extend a unit on heat transfer, or even experimental design. Of course, it could also be a great activity to use with a sub, before or after the break, or any time you need to fill time. The module could take anywhere from two class periods to a week or more, depending upon how many of the extensions you use. There is one hands-on activity built into the module in Section 3 (Live Burns) after the video, at the top under the link 

There are also additional activities on their main website, under Xtensions.

Things to consider?

This activity is great, but there are two caveats to keep in mind, as a classroom teacher, and they are pretty simple:

If YouTube is blocked at your school, you may run into problems. The videos are beautifully embedded, and look like part of the website, but they are coming from YouTube and won’t work if YouTube is blocked. You may need to download these videos and show them together, or download and give students a separate link, but that will disrupt the flow of the activity.

The student’s responses on the final culminating activity, where they submit their claim, will get printed or emailed to the teacher, but the rest of the activity is self-guided. This would be fine for most students, and it is very straightforward, but depending on your student’s needs you may want to make some type of guided notes to go with it, so that students have a reference point when they get the culminating activity, and also have accountability.

What to do next?

So where to go from here? Try it out! Go here and check it out! If you do use it, I’d love to hear what you think either in the comments below, in my Facebook Group, or anywhere else on social media or email.

A free NGSS aligned resource that helps students practice CER in an engaging way

Jan 24, 2018

Top 10 Tips for Teaching in the Inner City

This blog post was co-written by Becca from Science Rocks and Tara from Science In The City. They have 22 combined years of teaching experience in the inner city. To read about their backgrounds, hop down to the bottom of the blog post.

A collaborative blog post by two teachers who have a combined 22 years of teaching experience.  They share their tips for successful urban teaching and classroom management.

10 TIPS FOR TEACHING IN THE INNER-CITY

1. Always treat students with respect

 Every year I give students a student information survey the first week of school. And every year without fail I have students that write in the comment section “If you respect me, I’ll respect you.” It bothered me that they even had to request this, because it implies that generally teachers don’t treat them with respect. Along with this, be conscious of what they see as signs of respect and disrespect. Several of these are discussed below (learning names, being flexible and respecting their lives outside of school).

2. Learn names quickly! 

Not to single kids out, but to build relationships, and show that you are saying their names correctly and recognizing them as a valuable part of the class.

3. Build Relationships

Take time to get to know your students and understand their home lives. For many, they are working to support their parents, babysitting siblings, have little food, and/or live in group homes. This also goes along with why kids fall asleep in class and why they don’t get homework done. If you assign homework, make sure they can do it completely independently, without outside supplies, and be flexible on due dates.

4. Build Confidence

Give positive praise frequently, especially to students that are typically underperforming. One really effective thing I’ve found is to send a quick email, phone call, or note home when a kid is doing well and ask the parents to also encourage their positive behaviors. Once the student knows you are rooting for them and recognize all their efforts, they will continue to work hard.

5. Be flexible

Realize that because of their home lives, they may have ‘off days.’ While this can’t be ok all the time, try to be a bit accomodating for students to make up work in extenuating circumstances. When a student returns after an absence, be sure to say something along the lines of “Welcome back - we missed you” rather than “where have you been? Why weren’t you in school?” or even “How was your break?” as for many kids their home situation, or their break were not good and this can trigger many negative emotions open up a conversation that you may not want to have during class.

6. Use Proximity

Consider ways that you can move around the room more - wireless mouse, more group work and stations, so that you have more opportunities to be in proximity and interact with students.

7. Be clear and consistent with expectations, and always be equitable with consequences

Class will run much smoother if students know exactly what to do when they enter the room, when it is appropriate to get up or use the restroom, or when it is ok to chat with their neighbors. If they aren’t meeting those expectations, be sure to be fair and equitable with the consequence. If one student gets a warning for having their phone out, but another student gets theirs taken, they will call you on it.

8. When possible, support them in extracurriculars

Many students don’t have parents that attend extracurricular activities due to work or family circumstances. If they see you there and know you have interest in their lives it really pays off in the classroom. Even if you can’t be there, try to ask them about their games and events the next day, or congratulate them, if appropriate.

9. When appropriate, try to not use names when redirecting behavior. 

Even as adults, we don’t like getting singled out for every little thing we do wrong. If you can avoid calling a student out then often times they will respond better. For example, if someone is whistling, instead of saying “Daniel stop whistling” try something like “if whoever is whistling could stop I would really appreciate it” and continue with the lesson.

10. Don’t assume a kid isn’t working because they don’t want to

It is highly possible they have tried to complete the work but they don’t have the skills. Many kids in group homes or other transitional living arrangements have been passed from school to school and have very low reading and writing skills. Make sure to scaffold and modify for these students. Also, some students might not be working or taking notes because they need glasses and can’t see the board. Look for cues such as students squinting and ask them privately if they need help getting a pair of glasses.

Tara’s Background

I started teaching 12 years ago, and ended up in an urban district. My education program had a big focus on urban education and social justice, but it wasn’t a particular goal of mine to teach in an urban district. However, I student taught in the city (as well as a neighboring suburban district) and it just happened that my urban cooperating teacher was retiring and negotiated with her principal for me to get hired into her position. I was pregnant (not very marketable), but she worked it out so that I was able to co-teach summer school with her, and she would be the sub for my maternity leave in the fall. I had a good experience student teaching with her, and it was too good of an offer to turn down!

Thus started my urban teaching career! I have now taught for 12 years in one of the poorest, lowest achieving districts in the state. I stayed at that particular school for 5 years, teaching Earth Science and Environmental Science. Then I transferred to a different school and taught middle school science for 2 years. Then as that school was closed down by the state, I moved schools yet again in the same district and taught 2 years of 9th grade Biology. During my last 3 years I have been working in a program throughout the district for students who are behind on credits and are taking classes online that they have previously failed for “credit recovery.” Students are scheduled into a computer lab with other students who are taking virtual courses (but maybe not the same ones). Different subject teachers rotate between the different schools to meet with their particular students, but also to monitor the computer lab and help students (of any subject area). Each of these settings has been a new learning experience for me, as a teacher.

I grew up in the same area where I live, but in the suburbs, rather than the city. The urban environment was foreign, despite being only a few miles away. I struggled at first with what it would take to be successful in that environment, but learned quickly. I am fairly small, and can be soft-spoken. I often experienced disbelief from people that I could teach, or would want to teach, in that environment. However, I don’t believe successful urban teaching is about intimidation or being ‘mean.’ For me it has been about building relationships, and seeing success for students who don’t have a lot of other sources of support, or models in their lives. For many students, knowing that someone cares, believes in them, doesn’t give up on them, and someone pushes them to do their best goes a long way. Many students come from families where no one has graduated from high school before, parents don’t speak English, and they may not have a stable place to sleep at night. Yet they generally want to be successfully at school, and to graduate, despite having so many strikes against them. I am proud to be able to be a small piece of that!

Becca’s Background

I started teaching 10 years ago and honestly didn’t give much thought to what type of school I wanted to end up at. After graduating (with student loan debt looming) all I cared about was getting a job. I completed my student teaching in the fall semester and wasn’t hopeful I would find a job mid-way through the school year. I started googling schools in my area and found out a middle school not too far from my apartment had a science position open.

It turns out the particular school that hired me had the highest poverty rates in the entire county. Many of the families were living in shelters or staying in cheap motels. We would send food home with the students on Fridays or many wouldn’t have anything to eat over the weekend. It was heartbreaking and also the most fulfilling job I could have asked for. I fell in love with the students and quickly learned teaching strategies that worked for me and my classroom. I remember my first month teaching I had colleagues mention to me “You need to be mean or they will walk all over you.” It turns out that what those students really needed was quite the opposite. They needed a mentor. They needed to be treated with respect. They needed to be understood. They needed to feel like my classroom was a safe place for them.

I’ve since moved from middle school to high school but am still teaching in a title 1 district and don’t see that ever changing. Each school and demographic has their own battles and struggles to overcome, and I choose to put my efforts towards helping kids in low income areas. Am I going to get starbucks gift cards for Christmas or teacher appreciation week? Nope. But I’m getting something far better. I’m building relationships with kids whom many had given up on. I get to help kids be first generation college students. I get to learn and teach humility and empathy on a daily basis. I get to truly make an impact on their lives.

A collaborative blog post by two teachers who have a combined 22 years of teaching experience.  They share their tips for successful urban teaching and classroom management.

Jan 7, 2018

Living Environment Regents Review


If you are a Biology (Living Environment) teacher in New York State, you may be thinking about the upcoming January Regents Exams. Do you have students in your classes who are going to be re-taking the exam? Did a counselor or administrator just come to you to help a senior who needs that exam to graduate. Maybe you just taught a semester class, or even a Regents prep class, but are looking for a way to wrap up or are feeling rushed for time. Looking for a way to determine what to focus on for the January exam? I can help!

Tips as well as a free resource to help students with the NYS Living Environment Exam


This Regents Review Resource is focused on the topics that are most frequently tests, from analysis of past year’s exams, and looking at common diagrams, types of questions, concepts, and vocabulary. There is so much in the course, but in reality, there are key concepts that always make up a substantial number of the points. Use this to your advantage! (And, more importantly, your students’ advantage).

Cell Membrane Review For Living Environment from Science in the City

Click here to get a one page (single topic) review sent to your email.


Living Environment Review Free Sample
.

This resource can be used in a variety of ways, depending upon your available time. You can review one page (topic) per day. You can have students work in partners to do a page and then go over the answer. An answer key is included, so you could absolutely just give it to them at home, with or without the answer key. Of course, since it is divided by topic, you don’t have to use all the pages. I have some really creative ideas where teachers have set up stations, or contests between different groups.

Some of my most recent feedback:


If you are looking for other ideas for to review, I would suggest you check out some of my earlier posts on Fun and Easy Ways to Gamify your Review and Tips for Successful Year End Review

I’d love to hear about how you review, and what you find most helpful to get your students ready for Regents Exams.

Tips as well as a free resource to help students with the NYS Living Environment Exam

Dec 31, 2017

Citizen Science: Real Scientists in the Classroom


Citizen Science: Real Scientists in the Classroom

Many times we try to do an activity with our students that we think is ‘fun’ or ‘engaging’ but we hear from our students things like “why do we need to know this?” or “this isn’t important.” Citizen science may be a missing piece to show our students that science is real, and they can be part of it.

A description of Citizen Science and resources to get started in your classroom

What is Citizen Science?

Citizen science projects are run by real scientists, but allow citizens, to help collect data, and be part of active scientific research. Here is a great infographic answering the question “What is Citizen Science?” from the Citizen Science Center.

Here is a more thorough description, and even a great TED talk on the importance of Citizen Science. The TED talk would even be a good introduction to share with your students.

Why do citizen science with your students?

Being involved in a citizen science project can give your students a real sense of purpose, and can also expand upon what they are learning in class. These type of projects allow student to have experience ‘real science,’ and perhaps most importantly to to connect what they are learning to a real audience, so that it is more relevant. It allows them to get out of the classroom, and to put what they have learned in a larger context, or learn an extension. Here is a whole article on 8 Great Reasons Why You Should Use Citizen Science in Your Class.

How do I implement Citizen Science?

That’s really up to you. An entire elective course could be built around Citizen Science, a unit, an extension project, and extra credit project, or even a introductory.

Where do I start?

Here is a printable list of resources and sites to search for Citizen Science Projects.

A great resource to start with is these books. The first is endorsed by NSTA (National Science Teachers Association), the second is not specifically, but both are excellent! (affiliate link).


We also had quite a lengthy discussion in my Facebook group on this post. There are some really cool ideas being thrown around, and I’d love to have your input as well if you have done any of these. There is an almost endless array of different types of projects and topics, so find one that aligns well with your curriculum, your geography, or that interests your students and get out there and try it out!

Here are some links of places to look for projects (and I'm sure there are more).
Scientific American
The Litterati (data collection on litter)

Then report back! We’d love to hear how it goes!

A description of Citizen Science, and resources to get started doing citizen science in your classroom

Dec 17, 2017

5 Reasons to Use Memes with Your Students

Why and how could you make memes with your students?

We, as teachers, are always looking for ways to connect with our students and their lives outside of school, as well as to get their attention and help them to remember the content we are trying to teach. Making memes either for your students, or having them make memes are great tools to do just that.

The How and Why of Making Memes with your students

First the HOW. 

That’s the easy part! There are several websites that will quickly and easily allow you to put in a picture, or choose from one of the common pictures that are used in memes, and then input your caption. Then you can download your new image. They are VERY easy to use.

Here are a few that I would recommend
All three websites function very similarly, and are really straightforward to use. Not much farther explanation is needed there.

Examples

Before we go much further into the WHY, let’s take a look at some examples. Here are some great examples of both teacher memes, memes that you might use with students, and even one that students could create as an assignments. Click through. What emotions or reactions do you have as you go through?


Created with flickr slideshow.
As you clicked through, what did you feel? Were you amused? Did you feel sympathetic? Did you laugh out loud? We know that when we emotionally connect to something we are much more likely to remember it, and the same is true for our students!

The Why

When something evokes an emotional response, students remember it, they are more engaged, and more attentive. Memes express what we are feeling and thinking so well, sometimes better than words alone can do. In order to make appropriate memes, you must really understand the content (or rule or situation). Lastly, memes connect with students where they are. Memes and gifs are common all over their world, in social media and chatting apps.

Uses in Class

So how could you use memes in your class? Could be when you go over rules, or remind students of classroom procedures. I think it would be great to just have one ready to flash up on the screen sometime when students are talking while you are teaching. It would get their attention, and they would really understand what’s going on. You could have students make memes as a way to show their understanding. Memes could be part of a review activity, or possibly even an assessment that would make a great bulletin board or display. Here is a great example from Themetapicture.com if you are teaching about pH.
Or learning about solar energy, you could give them this meme, and ask them to explain what’s wrong with it.
Memes can be a great way for your students to get engaged and show their creativity, as well as make your lessons more memorable. Have you tried this or a similar activity with your classes? If so, please share your favorite meme in the comments, or in the Facebook group!
How and Why to use and make memes in the classroom

Dec 3, 2017

What can be learned from negative student interactions

What can be learned from negative student interactions

Reflection and suggestions on our role in student interactions

Some of the most difficult students have a lot more going on behind the scenes than we are aware of. Much of that is out of our control, but how we respond is in our control, and what we learn from it is in our control.

Sometimes the students will tell us why they are acting that way, sometimes they don’t. Sometimes we find out later, or we may not. You may only see the behavior, and not know the reasoning behind it.

I have had students who are usually good kids, but are acting out on a particular day. Some of the reasons that I have heard include the following: I was up most of the night because there was a shooting at my house, and the police were there. Students who miss a lot of class may not be because they don’t want to attend. I have a student who misses a lot of school. I have been on her case to attend more regularly. I have tried to call home, but have never been able to speak to anyone. Then I find out that she doesn’t come to school because she is often taking of her brother’s baby, because the baby’s mother is out of the picture, and brother works to support the baby. I have worked with students whose parents are in and out of medical care, and who don’t know where they are sleeping every night.

The stress in some students’ lives is beyond our comprehension, sometimes. Particularly when we figure in the fact that they may not have the role models and support at home to figure out different options. 

Choices we have

All of these things are difficult, and largely out of our hands. However, as a teacher, we have a lot of choices regarding how we react to the situation. You can give sympathy, but be careful not to get drawn into either a soap opera, or to lowering standards and excusing behavior, or academics. It is important for students to know that you still uphold those standards, but are willing to work with them. This means being flexible. You could give an extension. Maybe you allow the student to come in after school and work on an assignment. Maybe you could give an alternative option to complete the assignment.

You could allow the student to have his or her head down for one day, as long as it doesn’t become a habit. Give them a pass to the nurse or counselor if they ask for that.

It is important to show concern, and show that you care, but not to lower your standards. Treat them the way you would want to be treated. Give the student the benefit of the doubt that they are telling the truth, and needs what they are asking you for. Then work with them to develop a plan where they can still be successful and complete their work. Maybe negotiate, if you get some work done, you can go to the counselor during the last 10 minutes. It’s scaffolding really, just not scaffolding of academics. Scaffolding of coping skills and problem solving skills that many of our students don’t have.

Your other options as the teacher are to go to either extreme. Hear their story and excuse them. (This isn’t the most common option). The other option that I have seen is to really draw a hard line. It might sound like this “No, if you are in class you need to be doing work! This is not a place to have your head down!” “Go see your counselor another time, you need to stay in class.” Or worse yet, to take the head down, or refusal to work personally. That might sound like this “Don’t disrespect me! I told you to sit up. In my classroom you have to follow directions.” This really risks alienating students if they feel that you don’t care about them as people. There are bodies of research showing that students need to feel cared about in order to learn successfully. That is discussed more thoroughly here.

What are the Costs and Benefits? 

What are the benefits of taking a more compassionate route? First of all, you can always say ‘no’ the next time, or ramp up the consequences, but it hard to repair your relationship with the students. If it becomes a pattern that you are really concerned about, you can address it differently. However, a student may actually work harder for you because they know that you care. One of my past administrators said to me that if a student is really fixated on leaving (going to the bathroom, nurse, counselor), they aren’t paying attention anyway, so you may as well write them a pass. You are building a relationship with a person, not only teaching academics. By working with them, you are showing them respect. They will (likely) show respect in return. Finally, as young adults, they are working to be more independent, and to problem solve and their own. It is our role to give them the opportunity to do so, give them a little wiggle room to learn, and then help teach them the skills to do so more successfully.

Our education system, as we probably know, is very ‘one size fits all.’ Our students, however, are not one size fits all. This is another step that you can use to instill some flexibility into your classroom, particularly when dealing with diverse students.

If you try any of these strategies, or something similar, leave me a comment below. I’d love to hear how it works out!

Reflection and suggestions on our role in negative student interactioins

Nov 5, 2017

How to Use Technology to Differentiate


Using Technology to Make Differentiation Easier

How to Use Technology to Differentiate
We have all been there. We are supposed to teach students to meet the same standards, but we definitely do NOT have 25 of the same students sitting in front of us! How do you meet these varied needs within one class? You may have student reading at a huge range of grade levels, or students with a wide range of disabilities, and capabilities, or even students for whom English is not their native language. This is where differentiation comes in! Differentiation can be overwhelming, but it doesn’t have to be so overwhelming. You can make some small changes that can have a large impact on your students, and technology can help make that a lot easier for you.

As we probably are already aware, there are many different ways to differentiate. Differentiation is commonly broken down by process, product or content. For any of these methods, technology can be a great tool for differentiation. Here is good basic overview of the three types of differentiation, if this is new for you, or you want a quick refresher. I am not going to rehash all of that, but instead I will seek to give you some tips on how technology can help you differentiation.

Differentiation by Content

Differentiation by content refers to different ways that students could get the content, or perhaps even slightly different content. What students are learning may be different. Some students may get the material through reading, watching a video, small group instructions, or even different videos, or different reading levels. Students could even read text off of a screen, but use a screen reading chrome extensions so that the text is read to them.

Look into Newsela or readworks for levelled reading materials, and videos already discussed such as Bozeman Science, Khan Academy, Amoeba Sisters, Crash Course, and many others for content at the appropriate level.

This is a place to play around with a flipped classroom idea, and create an instructional video, even if students watch it in class. It allows them to watch and replay, take notes, while you work with other students, and maybe a third group of students reads about it. You can, essentially, be in more than one place at the same time.

This can be done by choice, or with different content sources assigned to them. Google Classroom makes it very easy to assign different content sources to different students.

For additional information, here are some great step-by-step directions for using Google Classroom to differentiate.

Differentiation by Process

Differentiation by process is all about what the students do to process the information, or HOW they get the content.  Differentiation by process can certainly overlap with content differentiation, as students may work through the content using one of these processes (think-pair-share, reflection, diagram labeling, etc). Content differentiation is the content itself. Process differentiation is how students take in the content, or what they do with it to process it. For example, even as students are taking in content, they can use screen reader extensions to read the text, use dictionary or translation tools to help understand the text.

Process differentiation means you may give an assignment with some options. Perhaps some students can work in a group, and other can work alone. Students can choose to use technology, or to do their assignment on paper. Students need a way to process the material, but there are many ways that this can be accomplished. Students can process their learning through drawing, writing, making a video, using a technology such a flip grid, talking with a partner and more. Some students may be helped by a video that they can pause, rewind, re-watch, and use closed captioning.

These methods may need to be taught, or alternated/cycled between, and then eventually students could perhaps have a choice. Another strategy would be to give students a choice between just two methods, and then gradually introduce other methods.

The Science Penguin has a great post on “Output Ideas.” Although these are designed to be on paper, it is not a leap to see how these could be differentiated even more easily with technology. Students could make a short recording, find a diagram and label it, type their response and more.

For more ideas check out this post on 4 Technology Rich Ways for Students to Demonstrate Knowledge

Differentiation by Product

Lastly, differentiation by product is probably the type of differentiation with which we are most familiar, where student create a product to demonstrate their learning and are given some type of menu, or choice. A very simple example is this Vocabulary Menu where students have a choice over what the turn in to demonstrate their understanding of the vocabulary terms.

This is also a great place to look at the post on 4 Technology Rich Ways for Students to Demonstrate Knowledge. Technology gives more options. Are you artistic? Make a poster. Not artistic? Make an infographic or slideshow, where you don’t have to draw. Would you rather write? Or speak? Write an essay or editorial, or make a podcast or video.

Just like in the regular class, without technology, differentiation is key to helping your students be engaged and feel successful. The methods to differentiate may be similar, but it is easier in some ways to make changes to the assignments and to have the changes be less visible (such as through the use of screen reader apps, or Google Classroom to distribute differentiated assignments to different students). There is less stigma attached. Also, technology helps create a classroom culture where students are more independent learners, learning in their own way. This is a great fit for differentiated instruction.   Using technology means you can use the tools available to you to help create modifications, or create additional instruction.  You don't have to create it all!

How to Use Technology to Differentiate


Oct 22, 2017

Easy Bite Size Steps to Increase Classroom Technology

Bite Size Steps to Increase Classroom Technology

Easy Bite Size Steps to Increase Classroom Technology

If your school has just recently gone 1:1, or just announced that they will be going 1:1, hopefully I can help. This is part 2 in a short series to help you transition to 1:1 technology.

This post will assume that you have gotten some of the procedural details and routines out of the way that were discussed in Part 1. Now you are looking for some ways to transition into using more technology in your classroom.

Ten Small Steps to Start Using Your New 1:1 Technology

  1. A video station - There are huge advantages to having students watch at their own pace, and be able to rewind, pause, or replay as needed. Here is a good discussion of using videos in the classroom. One of my favorite strategies is to have the students watch at a station, with a partner, and do a strategy that I call “watch, talk, write.” Students watch a short video with a partner. Talk about it with their partner. Then they write a short summary, often of a specified number of sentences, where they have to decide what information to include.
  2. A vocabulary station with Quizlet - Quizlet is a great site for students to review vocabulary, or really anything that needs to be memorized. You can even add in diagrams with labels where students can quiz themselves. This could be an early finisher activity, a station, or a whole class activity. 
  3. Review games using Kahoot - Kahoot is a great way to do review. It can only be used for multiple choice or objective questions, but students get so engaged! Its quick and easy to set up, and students love it. 
  4. An alternative way to do a research project - rather than only a written essay or research paper, check out these ideas for technology-rich ideas for students to demonstrate knowledge.
  5. Formative Assessment - My favorite formative assessment tool is Google Forms, but there are many others out there as well (Socrative, Plickers, and many more). I have written about Google Forms a few times before, here, and here, and a bit about Plickers here
  6. A virtual field trip or interactive website. Here is a great start on places to look for interactive 
  7. Resources for kids to use when they finish early - Having technology in your room gives more options for differentiation, in a lot of ways. However, one great tool is the ability to have more websites available for early finishers for review, enrichment, or reinforcement. Quizlet is great, various websites with science news articles, or, depending on your state, practice exam questions. 
  8. Change an assignment to a Google Doc - Google Docs have a lot of advantages, they can be accessed anywhere, they save automatically, and they can be shared. It is fairly easy to upload an existing assignment and convert to a Google Doc, making a copy for each student, or distributing through Google Classroom. 
  9. Video instructions of a lab or of a lab demonstration - If you are doing a demonstration, or giving instructions of how to do a lab, it can be extremely helpful to video this. Students can rewind and pause, students who are absent can watch, and somehow they even seem to pay closer attention to a video than to the teacher! This video can be uploaded privately to YouTube, or to Google Drive and shared with students as needed, or posted in Google Classroom. 
  10. Background research or vocabulary research going into an activity - before beginning a unit or an activity, we all know that students need to build background knowledge. As they are all coming from different places, and starting with different amounts of background knowledge, it can work well for them to research vocabulary terms, or a specific topic for background knowledge on their own, before diving into the instructional part of the unit. 
I hope this helped you consider some ways to start using technology in your 1:1 classroom! It can be overwhelming, but don’t get overwhelmed. Take it one step at a time, and don’t be afraid to try something.

Questions? Ideas? Suggestions? Please comment below or join me in the Facebook group.

Bite Size Steps to Increase Classroom Technology

Sep 27, 2017

4 Technology-Rich Ways For Students to Demonstrate Knowledge

4 Ways to Students to Demonstrate Knowledge with Technology

4 Technology-Rich Ways for Students to Demonstrate Their Knowledge

Many times we asked students to do class work in such a traditional manner, such as to write a research paper, write an essay to present their knowledge, in written form only. While it is important that students can read and write, This is not the only way for them to show their knowledge. It's important to give an element of choice as well as to give variety throughout the year so that students who excel in other areas, or who struggle with writing have a chance to show their knowledge.

Why not just write an essay? 

Perhaps that particular student is not a strong writer, but really does know the content. Or may they are really good at animation, graphic design, sound effects, or some other aspect. It's time that their knowledge show through. Some great ways for them to demonstrate their knowledge, other than written expression would be a screencast, Thinglink, a PowerPoint or Google Slide presentation, a podcast, or even an animation such as PowToon. Sometimes, even if the student is a stronger writer, having an aspect of choice is so important. Allowing the student more choice over how to demonstrate their knowledge is a way to get more buy-in and engagement from him or her, and more excitement about the assignment.

Podcast

A podcast is a very easy alternative to implement, and has many different applications in the classroom. Students could simply do a voice recording on a tablet, phone, computer with a microphone, or many other devices. If you actually want it to be posted as a podcast available online, this is possible too, and there are a lot of tutorials and guides online. However, for a single assignment, it would be appropriate for students to just make a recording, and it could even be shared as an audio file on Google Drive, if you choose. The downside of this is it of course you can't include any visual elements but for some students and some topics this will be enough.

Screencast

A screencast is a recording of the computer screen it can be done with a camera with it, showing the student's face, or without and can record only the tab or the desktop of the computer, along with recording audio. This is a very simple way to record a short presentation with narration, a technology skill, or student presenting or showing a particular topic or skill. There are lots of ways to do a screen test but my personal favorite is the Chrome extension screencastify I believe you can make a free recording up to 10 minutes and the results is saved right in Google Drive. Very simple!!

Thinglink

Thinglink is a paid product, but there are also free accounts with a few limitations. Thinglink allows the student to start with a picture such as a map, photograph, diagram, etc and then add certain buttons with information and links, videos, sound files, or even text documents and callout buttons to make a multi-media clickable image. Again, this depends on the topic, and how it is best suited. I think this would be great for presentations where you want to show a lot of information from different sources. A word of caution, be careful that the student is able to summarize their information, or paraphrase and cite the information, because it can be very easy to just cut and paste a lot of information. Thinglink is a great way to make a really different kind of presentation and include various kinds of information. Here is a great example of a human body presentation.

Powtoon

Powtoon will allow students to create an animation. They write the script, and record the audio, and then choose different backgrounds, characters, and what they will say. Here is an elementary example


Example Human Body Thinglink

Powtoon can be a lot of fun and very interactive for the students. It is quite different than what they may have done before. The warning on this one is that there will be a bit of a learning curve for students. It may take some time for them to get comfortable, so allow extra time to learn the technology if you choose this method.


Lastly, don’t rule out a PowerPoint or Google slide presentation. This is not really a brand new method, but can be an alternative to a written presentation. Both allow shorter, more broken up writing, and the insertion of videos, images, and other multimedia formats into the presentation. Google Slides is easier to insert videos and easier to share the final presentation. PowerPoint is easier to insert narration or sound files if this is something that you want students to do. Adding audio to Google Slides is difficult.

As we transition to using more technology, under the SAMR model, these may be some ways to push your teaching, and your students learning, to the next level, and to further engage your students. Have you used any of these in your classroom? What other alternatives do you utilize, besides a written essay, do you use for students to demonstrate knowledge? Please share in the comments.

4 Ways to Students to Demonstrate Knowledge with Technology

Sep 10, 2017

5 Free New Technologies to Try in Your Classroom Right Now


5 Free New Technologies to Try In Your Classroom Right Now

With all the technology available, it can be overwhelming. Here are 5 (and a bonus) new technology options that I suggest you try in your classroom this year, in bite-size pieces. They are easy ways to liven up some of your instruction and find new ways to engage with and connect with your students.

Screencasts in the Classroom

It can be intimidating to think of doing a video, but don’t be intimated. First of all, you don’t need to have your face on camera! This is key! You can do a screencast of your computer screen, of a file or PowerPoint, or a series of photographs or images, so you are really just doing a voice over.

There are several easy ways to do a screencast. If what you are doing is short, there is a Google Chrome extension called screencastify that will allow you to record camera, your desktop, a browser tab, audio only, or other combinations of that. It will save to YouTube and/or Google Drive, making the sharing of your video very easy.

If you are making a screencast based on images or slides, my favorite way to do it is in PowerPoint. It is pretty easy to “Insert Audio” and then have it play with the slides (you can set timing as well). Then export the whole thing as a movie when you are happy with it.

Why make a screencast? I have seen people screencast instructions or a mini-lesson for a sub, although I haven’t done that myself. I have used it to allow me to be in two places at once time. For example, I have used it to give directions at a station, while I’m free to circulate. I can show a lab demo, and kids who were absent can replay it. I can give instructions or introductory information, and, again, students who were absent can catch up easily. I have even used a video at one station, while I work with students at another stations.

Flipgrid

Flipgrid allows you to have short online video discussions with students. You post a prompt, and student can response via video. It's like FaceTime or Skype, with classroom applications! Here is a great write-up of some ways to use Flipgrid in class. Here is a really awesome example of a class using it to connect with a researcher in Antarctica

Plickers

We already have a lot of formative assessment tools available. What’s different about Plickers? Students don’t need devices! It's a technology tool because it uses technology to improve speeds, data collection and to make your life easier, but if you don’t have a lot of student tech, this is a great one to try.

To use Plickers you get free printable cards. They have a symbol on that that will not be recognizable to other students (so students won’t know what choice their peers are making). Also on the card, in small, lighter print, are choices (A, 1, B, etc). These cards can be assigned 1 per student, so you can collect data on each student’s individual answers.

When you ask a question, students hold up their card with the answer choice that they are selecting facing up. You take a picture, with the app on your phone, and your data is collected. Here is a video that shows in more detail.

Edpuzzle

If you want to use videos in your instruction, whether they are your own videos, or those from another source, consider EdPuzzle. You can make questions that go with a video, on a worksheet, or you can build in questions and quizzes into the video itself with EdPuzzle. This also gives you the option to enforce that students watch the entire video.

Lastly, there are many videos that already have questions. You can choose from these videos, and copy and modify the questions yourself. Here an example of an Amoeba Sisters Mitosis Video that I found (I did not make up the questions).


As a teacher, you can have your students sign up for a class, assign videos, and you will be able to see their progress in the video and all their quiz answers. You can also just give students a link to a video directly, if you don’t need as granular data.

Padlet

I have used Padlet only minimally myself, but it is one that I want to try more, and it is growing in popularity. It has a lot of potential uses, so I think it should be included on this list. Again, its very easy to use. It bills itself as “the easiest way to create and collaborate in the world.” The teacher (or someone) makes a prompt, on a ‘board’ and students can respond. Think of it as a big wall with sticky notes. However, those responses can also include links, images, etc, and you can build connections between the responses. Padlet is an extremely easy way to collect a lot of information quickly, and to have collaboration.

Bonus… Nearpod

I have not used Nearpod myself, so I’m not writing a lot about it, but I wanted to at least mention it here, in the bonus section. Nearpod allows you to add interactive elements into a PDF document, or into slides. In other words, it add more interaction into a 1:1 classroom. Here is a video showing it in action.


This is Nearpod: the 21st Century Classroom from Nearpod on Vimeo.

What's on your list of new classroom technologies to try?  Have you used any of these?  Tell use about it in the comments!
5 free new technologies to try in your classroom right now
Related Posts Plugin for WordPress, Blogger...