2018Science in the City: 2018

Dec 8, 2018

Don't Panic! You Just Found out You're Teaching __________, Tomorrow!

Sometimes your teaching assignment changes, whether it be for the year or for the day/week. That can be enough to throw you into a panic, and cause a lot of stress!! But you can handle it!

Don’t panic!!

Strategies and Encouragement when you just found out your teaching plans were changed

Why did this happen?

There could be a lot of reasons that this happened. Some common ones I’ve seen are changes in course registrations or enrollments so that maybe extra section is offered, or one less section is offered and something else needs to fill in. Changes in staffing, even at the last minute someone quits, or their certification is not quite what it was thought to be. Things like assemblies, school-wide events, or other temporary schedule changes, or even weather delays, that can throw your plans out the window!

What Do You Do First?

Regroup, and don’t panic! You are a trained teacher, working with kids, and you know how to do this! Think about the big picture. What is the purpose for the change? What do you need to do right away? Do you need a filler activity for one day? Do you need to just start with some basic science skills while you let things settle out, and give yourself a chance to get planned further ahead?

For many of these situations basic measuring and graphing, news articles about current science news, or a controversial science related topic can be a good place to start. You get a chance to assess students a bit, and they get to know you, and hopefully get some interest up about the upcoming class.

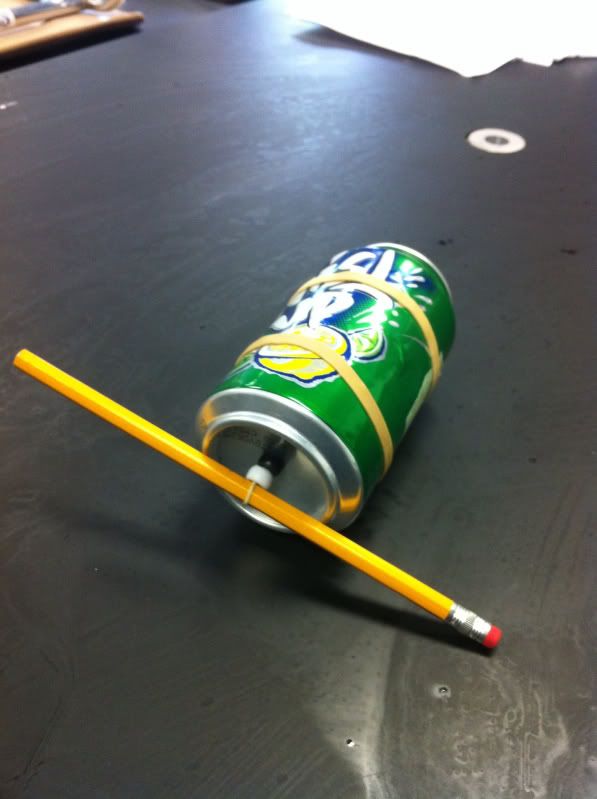
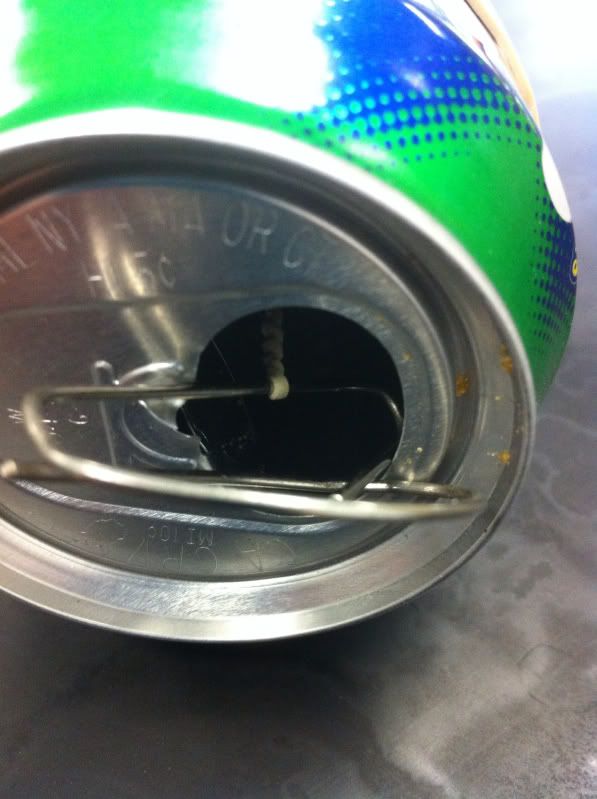
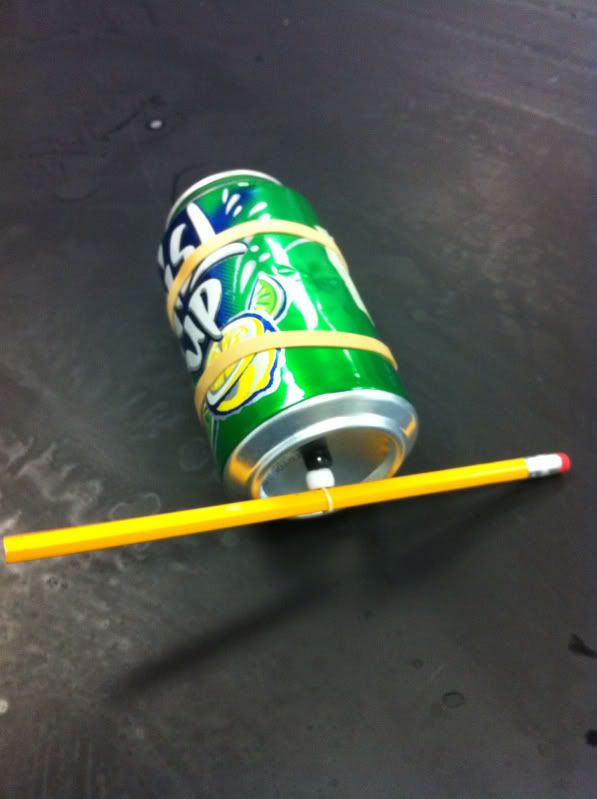
A few activities that would be good for this situation would be this Buoyancy: Diving Ketchup activity, or this E-cigarettes Literacy Article and Position Paper.

What’s the Next Step:

It depends on your situation but if this is a longer situation than just a day or two, and you need to make some bigger plans, here are some ideas:

  • Look for other resources

    • This is the time to lean on your colleagues, whether it is your real-life colleagues, those through professional organizations, Facebook groups, Twitter, Pinterest, or get on some mailing lists and make connections. Now, with all the technology at our disposal, it is easier than ever to make connections, share ideas, and find resources.

  • Keep it simple

    • This isn’t the time to design the perfect lesson plan, but to think about what you can do that will be a good start; or a rough draft. Consider it a ‘beta version.’ Be ready to make revisions, but get something to start with. 

  • Take it one step at a time

    • If all you can do it set up a pacing guide, and plan some introductory activities, that’s ok for right now.
    • You know what students have to do to start, then soon come back to your pacing guide and focus in on Unit 1. It will get easier as you get going, but don’t get too overwhelmed.
You can do this. And if we can help at all, don’t hesitate to reach out in my Facebook Group and ask!

Nov 24, 2018

Practical and Inspirational Lessons from Ditch Summit

What is Cue Craft Summit?

Cue Craft #DitchSummit is a free, online virtual conference for educators by educators. It was sponsored by Adobe, and featured 8 speaker videos last anywhere from 30 minutes to an hour. They're practical and inspirational, from hand-picked education leaders.

Practical and Inspirational Lessons from Ditch Summit

The sessions that I attended in August included:

  • Solid Teaching Craftsmanship for EVERYONE - Jon Corippo and Cate Tolnai 
    • Emphasis on the creativity of both the teacher and students, with a priority on the educator as a learner and craftsman first. This requires a change in school culture
  • Practice, Powerful, Pedagogically-charged teaching - Jennifer Gonzalez
    • So much information is at our fingertips now that it is important that we teach our students to use and curate this information. We need to be smart and deliberate as we integrate technology into our classrooms. Keep track of where you are in the levels of knowledge, and what type of learning we are looking for.
  • Powerful pedagogy with Hyperdocs - Kelly Hilton
    • Hyperdocs change the focus to the students, and free you to work with students. Lesson design starts with thinking about your students, however, this doesn’t mean they are doing the lesson alone. This requires the careful blending of tech/no tech and thinking about the best tools and skills for students to accomplish the task. 
  • Dynamic Google-Infused Learning - Kasey Bell
    • Technology is a tool, not a solution. You must have a purpose behind the technology, and purpose-driven professional development. There should be a focus on student learning. Dynamic refers to ways to extend the learning beyond the time and space of the classroom, and beyond traditional tools. 
  • The Purpose of Classroom Creativity - Ben Forta
    • Focus on kids being creators, not just consumers of information and content. This can involve different definitions of creativity, as different kids have different needs.
  • Powerful Learning Space Design - Rebecca Hare
    • This is not a focus on the furniture but look at the surfaces and space as a place to support learning and collaboration. Less can be more. This may mean using the space on the wall for students to put up their own, making flexible learning spaces, provide students with choices. 
  • Helping ELL Students Succeed - Martin Cisneros
    • Start with giving students the language that they need to survive, then move onto academic language. This includes a lot of non-technology ways to teach the English language, however also touches on technology as a tools that fosters collaboration and helps provide students with multiple ways to show what they know. 
  • Open Educational Resources - Kristina Ishmael
    • Open Educational Resources are teaching and learning resources that are in the public domain and allow for their free use, modification, and redistribution. She shared multiple resources for finding these tools, and benefits. Some of the benefits include flexibility for teachers to reflect, adapt, and decide on what fits their student’s needs the best. 

Main Takeaways

As I reflect on this fantastic learning experience, there are many specific tools and strategies that I can utilize, but there are some larger general messages that I want to share with you. I think in teaching we often get so focused on the day to day and the mechanics of lesson planning, that it is easy to lose track of the bigger messages.

  • Individualize (both for yourself and for your students; fit the needs of those you are teaching, and your style/personality)
  • Be Creative & Flexible (again both for yourself and your students)
  • Continue Learning (As a professional, we are hopefully continuing to learn and grow, expand our practice, and model lifelong learning for our students)
  • Focus on your students (All learning and lesson design should start with the students. Who are we teaching? What do we want them to learn? What are their interests? What do they need?)
  • Emphasize learning first, and then find the tools you need (Don’t use a hands-on activity, or a technology tool just because you want to use it. These are all tools that can be implemented to reach a goal. Find the tool or strategy that will help achieve your learning goal. Or use a tool in a new way. But these are tools, not the lessons in and of themselves.

Further Resources:

Cue Craft will be having another conference in December. Check back here for more information as it gets closer.

Nov 10, 2018

Valuable Free Sample! Simplified School Day Checklists

Why are daily routines important?

Daily routines are so important for our students. As parents, and as teachers, we know this. We spend a lot of time creating routines that will help our kids get settled in the morning, or help our own children go to bed at night. Unfortunately, we don’t do the same for ourselves! We would reap benefits from this as well.

I know the school day can be chaotic. There are a lot of interruptions and things that can break up our routine, but it can help to at least have a checklist of important tasks to do, or what you want your morning routine to look like.

We know routines are important for our students, but they are also important for us.  Get started with these routines

Where can you institute routines?

You could have routines for your arrival to school, the end of the school day, or even weekly routines.

Here are some examples of my routines:

Arrival to school

  • Set up materials
  • Get mail?
  • Answer emails?
  • Take care of any urgent details
  • Get yourself in the right frame of mind
  • Attendance ready/rosters printed, cabinets unlocked, personal belongings locked, etc….

End of the school day

  • Make copies
  • Set up your schedule for the next day - plan what to do in the bigger blocks of free time
  • Plan any upcoming materials that you will need later
  • Set up the agenda on the board, get everything ready to go
  • “Let go” of the end of the school day

Weekly Routines (to be done during planning periods)

  • Monday: Make copies for the week; post updated grades or list of missing work
  • Tuesday: set up lab materials for the week
  • Wednesday/Thursday: phone calls, grading
  • Friday: Work on plans for the next week, touch base with resource teachers etc. 
Of course, these will need to adapt to you and your situation, but hopefully, this will give you some ideas to get started and make sure your aren’t forgetting anything, or keep these things a bit less stressful.

Now, where do you keep track of these routines?

I am a huge digital person most of the time, but sometimes paper is better. Here are a few options

  • In your calendar or planbook, either with a paperclip or post-it on the page
  • In a sheet protector or laminated and taped to your desk
  • Google Keep (did you know you can just make checkboxes and then uncheck all). See the picture below

The bottom line - keep it somewhere that you will use it, and see it. If it helps you to physically check things off (like it does for me) then make that easy too!

What would you like to add to these lists? What fits your daily routines?

I would like to try something new on this post and make a shared document where we could all brainstorm routine tasks, to help each other think of where they fit in.  Click here to open this document in a new window and add your thoughts!  You can also certainly then make a copy of this document and use it to make your own routine checklists!

Oct 27, 2018

The Guide to Engaging Learning About Potential and Kinetic Energy

Making Potential and Kinetic Energy Engaging!

One of my most popular resources to designed to teach about potential and kinetic energy, but making a car out of common household materials (an empty soda can, a pencil, rubber band, and paper clip).

When students create these cars, there are some questions or places where they get stuck. With a little bit of preparation, this can be a simple and successful project for students ranging from upper elementary to even high school students. I have had students make this car in the class and then go home and make another one. Here is a close-up view that I took of the car in action!


Assembly Directions and Pictures

Here is a tip!  Use a hammer and nail or drill to pre-punch the holes in the bottom of the can. That is really the only tricky part and will save a lot of trouble.

Here are some close-up pictures of the cans assembled.  I hope this helps you visualize how they go together.

The completed car!
This shows how the paper clip anchors the rubber band. 
The beads simply give the pencil and rubber band more room to rotate. 


Further Inspiration and direction

In case you are looking for more inspiration, or an engagement video to get your students started, here are a couple other similar ones that will help you get started. This one is very similar and comes with complete assembly directions (this is not me in the video).

A slightly different, but similar racer made with a spool! This would be a great one to show students as an extension, or pre-activity to engage them and get their attention!

Extensions

If you are looking to extend this further, this is the perfect lab to practice experimental design. Students can choose one variable to test (number of rubber band twists, number of rubber bands, the size of the pencil, or countless others) and determine how it affects the travel distance or travel speed. 

Students can race their cars and have a competition.  You can set up a starting and ending line.  They will love this!!

If you want to try this activity in your class, with complete written directions and summary questions, check it out here.
The Guide to Engaging Learning about Potential and Kinetic Energy

Oct 13, 2018

How to Smoothly and Successfully Run Stations

How to Smoothy and Successfully Run Stations

I think we can all agree that we want our students engaged. They like to move around, and they have short attention spans, but we need to teach a lot of content in a short time. We need to keep kids engaged and have ways to show the information in different ways efficiently. We need times that some students can work independently, while we work with other students in small groups. 

I have faced this same problem, and I want to share with you one of my best strategies to overcome this problem. I teach in an urban district, with a wide range of abilities in one class, and often a lot of students that have lower reading levels, are ELL students or are special ed students.

One of my favorite methods of teaching is to use stations because it helps keep the students engaged, keeps them on pace, and gives me a chance to work with some students or groups individually.

My Five Biggest Tips for Using Stations Successfully

  1. Set a timer - I like to keep a timer running on the board when I am doing stations. It really helps keep the kids (and me) focused and on track so that they get done what they need to do in the designated time. It is easy to remind them when their time is halfway up, or when they have one minute to finish up. You can easily use a timer right in Google on the smartboard, or an extension like One-Click Timer or many others. Tip: Be sure to plan a minute or 2 to reset the timer and transition. 
  2. Make a map or clearly mark the stations - You can use my printable Station Signs, make your own, color code the stations, or make a map on the board but make sure that the stations themselves, and the order to rotate through them is clearly marked for your students. It will save a lot of headaches for you and them if they know where to go. Similarly, if you can, try to keep the rotation consistent the next time you do stations so that it is easier for students.
  3. Pre-determine your groups - There are lots of ways to determine groups (randomly, by interest, by ability so that you can work with one group, and many more). Any of these are fine, but put a little bit of thought into how you want to group students to enable the activity to work the best, and for you and the students to get the most out of it. Be prepared with how you are going to place students into groups, as well. Either have a prepared list, have them draw cards on the way in for random, etc.  
  4. Make the stations a mixture of hands-on and independent work - It will quickly get too hectic if all of your stations are doing mini-experiments or hands-on activities. I like to make this only at one or two stations. This allows you to spread out your materials, and better manage a smaller number of students who are doing a more active lesson. For example, I may have 3 stations (2 of each for a total of 6). One is hands-on, one is reading the background information or watching a background video, and one is graphing an analyzing their data. Similarly, if have a limited amount of technology, you can have a technology activity or video to watch at one or two stations, reading at one, and vocabulary/writing/labelling diagrams at another station. 
  5. Plan for the timing - It can get tricky when students at one station are done long before others. There are a few ways around this. (1) You have to be really sure that the stations will take about the same amount of time, within a few minutes. (2) If this is not feasible, or is not working out, have something ready that they can work on during the downtime. This could be as simple as starting homework. It could be ‘extra credit’ of some sort. You want to avoid them getting ahead on the next station. I like to keep the materials at each station, and have students rotate with an answer sheet, to help the timing go more smoothly.
Stations can be a fun way to keep students on-task and engaged, and for them to have a sense of success, as they finish a task in perhaps fifteen minutes. They know what is coming next, and they get to see the pieces come together. Both my students and myself have had a lot of success with using stations in science class, and I want you to be able to experience that as well.

If you try out stations in your class, feel free to comment below, send me an email, or join me on social media to let me know how they go, or what your tips are.

Sep 29, 2018

Top 5 Takeaways From the Hive Conference

A brief summary of top takeaways from the Hive Summit, Summer 2018


What is Hive Summit?

If you’ve never heard of Hive Summit before, it’s described as a free 14-day virtual educational conference. You sign up online, and ‘attend’ by watching and listening to various speakers on innovative educational topics.

If you missed it this year, I would definitely recommend attending in the future. You can find out more, and sign up at https://hivesummit.org/

Who Presented?

The presenters were some of the biggest names in innovative education at this point, with a few notes:

  • Dave Burgess - Share your ideas with others, and incorporate others’ great ideas into your teaching! You have access to great resources online to share ideas.
  • Rick Wormelli - A teacher is bound to ensure that students learn, and we can change our grading systems to ensure that grades help encourage growth.
  • Sarah Thomas - Connection and Professional Learning Networks are a fantastic resource. These can be digital or face to face, and can change your path; there are others seeking what you have to offer.
  • Rabbi Michael Cohen - creativity is critical because everyone is a ‘designer’ for someone, and creativity has to be a recurring practice.
  • Matt Miller (Ditch that Textbook) - Use educational technology to fit the tasks, and change traditional tools to be used in ways that are relevant to collaboration. We, as teachers, need to take risks and use technology to develop empathy and connect with others.
  • Michael Matera - Gamification is a way for teachers to overlay a game on top of content and instruction to allow collaboration, challenge, and to help increase engagement.
  • Tara Martin - Be real and be a risk-taker. Encourage change as a means of growth, and be a leader. This makes the collective whole better.
  • Joe Sanfelippo - We are better together in education. Share out the good things that happen in your classroom, and place value on others trying things outside of their comfort zone. Make connections, and show that you care!
  • Carrie Baughcum - sketchnoting is a new form of note-taking; it focuses on getting your ideas down on paper and connecting your ideas, as well as reflecting.

Main Takeaways!!

I took part in all the sessions, and it is almost impossible to condense 9 presenters into the Top 5 Takeaways, but I’m going to try. As I listened to and read all of these sessions there were several themes that kept jumping out at me.
  1. Take Risks - So many of these presenters talked about taking risks and stepping out of your comfort zone. This is where the change happens! 
  2. Collaborate - We are (hopefully) all in this for the students, and we don’t do our best work alone. We all have good ideas and individual specialties, and it is only through sharing our ideas out, being proud of what we are doing and working together with others that we can integrate those ideas and see the biggest benefit for students. Whether this is within your school, your region, Twitter, Facebook groups, Listserv, or any other PLN, use it!!!
  3. Be Unique - Don’t be afraid to be yourself! Some people are artistic, some are great at communication, some are great at organization. Don’t be afraid of that. Kids are unique too, and we need to build on that and find ways for them to learn more individually.
  4. Be Creative! - Creativity doesn’t just mean artistic, but it means being able to explore/experiment, and design. These are critical skills, for both teachers, college students, and workers.
  5. Reflect - as we try new things and grow, it is so important to reflect, look at what went well, and look at where to improve.
And remember, good practices for teachers are ALSO good practices for students! We, as teachers, are in a position to teach our students many of these same skills which will serve them well in almost any career, after graduation, and prepare them to be successful as they go out into the world!

So often I think we get focused on students learning content, but learning these skills of collaboration, reflection, creativity, and risk-taking are so important as well. Our classrooms can be a place of real, authentic, engaging learning where students can practice these skills.

Further Resources

For further information go to www.hivesummit.org and learn how to connect with each of the presenters and get more information!

***Bonus Starting Saturday September 29th through Sunday October 7th, the Hive Summit videos will again be available for a limited time. Sign up at (--->HERE<---), and don’t forget to tweet out what you’re excited to revisit using the #HiveSummit hashtag and/or by tagging @Hive_Summit.

Sep 23, 2018

Formative Assessment Top 5 Round Up

Formative assessment is critical and can be easy!

Formative Assessment is Critical and can be easy

Why is Formative Assesssment Critical?

We often deliver a lesson, class ends, students come in the next day, and we aren’t really sure what they remember, or what they understand.

They come into class the next day, and we are ready to start today’s lesson, but actually the students are not ready to move on.  They are still confused on information from yesterday.

As important as we all know formative assessment can be, it can be tedious to keep coming up with worthwhile questions, in addition to lesson planning and grading.

How can it be Easy?

I can solve that problem for you!

We all know that we have enough on our plates without creating daily assessment questions. However, having the right questions can be really important to get the information that we want.

I have created full year bundles of warm ups for Biology and Earth Science.  You can see the questions and preview them in more detail by clicking on the links. 

The Biology set comes in both Google Slides and Google Forms (also includes directions to use in PDF format, or in other Learning Management Systems. The Earth Science Set is only available in Google Slides (with directions for PDF or other LMS; no Google Forms at this time). 

Both include sets for each unit typically taught (13 units for Earth Science and 10 units for Biology), as well as a bonus set with some blank slides/forms, and general formative assessment questions that can be used anywhere you choose.  Each set includes 16-18 slides/forms with generally 2-3 questions each.  They are correlated with learning objectives (Biology and Earth Science), so that all objectives are covered.  Answer keys are included.  Many questions include diagrams, inferencing skills, etc.  There are a range of questions difficulties and styles of questions, allowing you to differentiate for your students. 

This is a topic that I have written about extensively, because I think it is so important.  I also written about other ways that I use these digital task cards, and how and when I use formative assessment.

My top 5 most popular posts on these topics are here:

I hope this answers most of your formative assessment questions.  If not, just comment an ask!!!I hope this answers most of your formative asses

Next time students are entering class you will be able to have a clear understanding of where they are and what they understand before you begin teaching.   I can make that extremely simple for you pull off!  Check out my full year bundles here.


Sep 9, 2018

How to Organize Bellringers or Tickets Out

How to Organize Bellringers or Tickets Out

How to Organize Bellringers or Tickets Out

What are some of the concerns? 

I have been asked about how I organize my bellwork and warm-ups, both in terms of how I organize the papers and the class time. Some of the complaints that I've heard are against doing warm-ups are: too much grading, too much time being spent in class time, wasted for students to settle down, too much shuffling papers and more.

Grading

I have already addressed the grading in a couple of other posts here, here, here, and here.

Timing

As far as the class time I'm really a stickler for using a timer and keeping my bell work very short. I know some people do bell work that's a bit longer, it depends on the length of your class, and how you want to run your class time.  I usually keep it to three to five minutes. My bell work is one two three questions. If it really seems that people are working and need an extra minute or two I make extend it.

I enforce that by using a timer that is visible on the Smartboard. Depending upon how you setup your bellwork there are stand-alone timers, internet timers, Smartboard timers, the 1-click timer Chrome extension and many others.

Paper Organization

As far as how to organize the papers I've done it a few ways. I like to keep all my bellwork questions for a one-unit together in either a Google slide presentation, PowerPoint, Smart Board file, etc. Then I have the students answer on a bellwork or warm up sheet link here.  They turn this in each day.  Before their class, I spread them out on either a back table, counter, or something like that.  On their way in the students can grab the paper with their name on it. It's a little extra incentive for them to get to class early or at least on time because the timer starts when the bell rings.

Electronic Organization

When I have done bellwork electronically I have most often used a Google form. I share the link through Google classroom.  They can quickly click on it answer, and all the answers come to me in one place.  I can also turn the form off when the time is up, so that they have to submit in a timely fashion.  I have also done a Google slide.  In this case, I have all my warm ups in that slide file. I copy just today's slide. share it with them through Google classroom or through a force copy.  They put their answers on it and then submit.  Google Classroom really facilitates this very easily.

Class Time

As far as during class time I can usually make a quick assessment if I want to discuss bellwork or go over it based on what I see when students are working.  If I use a Google form where I can get instant feedback then, I can pull the results up on the board and this can help me assess and decide if I want to have a class discussion. If I find out that I'm wrong it's perfectly okay to go back the next day.

What questions do you still have?  Ask them here and I will do my best to answer!

Aug 26, 2018

Save Time: Streamline Your Earth Science Year

If you are teaching Earth Science and you've never taught it before you may be a bit overwhelmed by how to organize the curriculum. Earth Science here in New York State is a combination of Astronomy, Meteorology and Geology with a little bit of Environmental Science mixed in.

That's a lot of different topics!


How to organize it in a way that makes sense to your students? There really a lot of right answers to that and if you look across districts in New York State, or across the country, you will find a lot of different organization systems, of course. I wanted to share with you the Scope and Sequence and pacing guide that I use to organize my class.


I follow this basic outline for a few reasons.

First of all, I think it's important to focus on some of the topics that we know will be on the New York State lab practical later in the year, closer to the exam. Those points are so critical to students really doing well on the exam. I also like to start out the year bringing in topics where things where we can get students outside for some very simple activities (looking at shadow lengths to study the Sun’s path, build in lots of hands-on lab practice early on). I also sometimes like to look at some news stories about hurricanes (often happening near the start of school), or use this as a chance to practice mapping, and foreshadow some of the topics coming later.

By the time we get to study weather and climate, we may have a storm or two to talk about and make some real-time observations. I also like to intermix, or spiral, the topics so that students see the connections between those topics. There are many other ways to organize Earth Science as well, but this is a system that I found works well. If you are looking for starting point please go ahead and download it. This pacing guide includes some basic objectives and approximate time for each unit it's a good pacing guide you going. Then you can always adapt as you see fit.

If you like this, you may be interested in my more complete Earth Science Curriculum Guide, or other Earth Science Resources that I have.

If you do download my free pacing guide, and it helps you organize and streamline your Earth Science curriculum, I’d love to hear your thoughts, either in the comments, or in our Facebook group!

Aug 12, 2018

Huge Secondary Science Giveaway

Super Science Back To School Giveaway! 

Huge Secondary Science Giveaway August 2018

Welcome Back Science Teachers!!

I hope you are thoroughly enjoying your summer!! I know I am! I can’t believe how quickly summer seems to be wrapping up!

Huge Seondary Science Giveaway August 2018

I know some of you are already back at school, and some of you have a few more weeks still.  Even if you’re not quite ready to go back, a bunch of science teachers over at TeachersPayTeachers want to make the transition back as smooth and easy for you as possible.

Fantastic Science Giveaway! 

We have a fantastic giveaway going just for you, science teacher. We are giving away FOUR $100 TeachersPayTeachers gift cards that you can use to save a lot of time and get some awesome resources for your classroom!

Take a few minutes out of the end of your summer to hop from blog to blog and collect all of our secret words. It will be worth it!! They form a secret sentence.

Once you have the sentence, go to any one of the Group Giveaway Rafflecopter boxes, on any one of our blog pages, and type in the secret sentence in the right order.

We will pick four winners after it ends after midnight on Friday August the 17th.

My Secret Word is #2: “knows”

Another Chance to Win! 

A bunch of us are also hosting our own individual giveaways as well, so make sure you stop by and enter to win! All in all, there will be over $1000 worth of prizes given away this week!

For my individual giveaway I am giving away $25 of resources from my store, Science in the City. You can choose any bundle or set of resources that fits your needs. When entering this giveaway you'll be added to my email list; I send out resources and tips for teachers each week!

MAKE SURE YOU SCROLL DOWN TO ENTER BOTH GIVEAWAYS!!


a Rafflecopter giveaway

Jul 29, 2018

Sharing Feedback on Google Assignments

Sharing Feedback on Google Assignments

When students are doing an assignment in Google Drive one of the difficulties maybe how to best get their scores and feedback to them. This is especially true if you are doing a series of smaller assignments, such as warm ups.


A few general ways

There are a few general ways to do this and I will give you some tips on each one. 

  1. Use a learning management system, such as Google Classroom (probably the easiest), Schoology or many others. 
  2. Give them feedback directly on the document using the comment tool 
  3. Create a spreadsheet or PDF document that lists grades by ID number. There are pros and cons of each of these of course.

In Google Classroom

In Google Classroom it can be pretty self explanatory to grade an assignment there, and give feedback. Then those grades will likely have to be entered into your gradebook, unless your school has a way of importing them.

Sharing a Single Slide and Giving Feedback

I have sets of warm-ups that are a set of Google slides that cover the whole unit. For example, here is a set that I have on weather.


If I want to share only one slide with a student that day, I would do the following steps:
  • Copy that slide to a new presentation
  • I would share with them through either Google Classroom, or by creating a force copy link. 
  • You can see what the student sees by clicking here.
  • The student then can type directly into the slide, and then either submit through Google Classroom, or share back with me. For me to be able to comment, they must share with either ‘can comment’ or ‘can edit’
  • It then becomes very easy to comment on their work, from my computer. More information on using comments for student feedback is available here.


If I do it this way, I often keep a piece of scrap paper next to me to record their grades, or another window open to record grades as I go through, if I am not using Google Classroom.

Google Forms and a Spreadsheet

I discussed how I use Google Forms and create a spreadsheet by ID number in this post.

Other Tools and Tips

There are other tools as well, which I will touch on just briefly.
  • If you are often entering repetitive feedback, and want to have a bank of comments, feedback, and even stickers that you can use, take a look at this article on using Google Keep for Quick Student Feedback

  • If you (or your students) would find it helpful to give spoken feedback, look into the Kazienza app. It is a very simple Google Chrome app that enables verbal feedback.

  • Only in Google Docs (not Slides, etc), there are several tools for rubrics, which can also simplify the process of grading and giving feedback to students. This can also be done within Google Classroom. And lastly, one more Google Classroom rubric hack.

I hope that these tools help make your digital transition a bit easier, as you find more effective ways to manage your grading and give feedback to your students.


Jul 15, 2018

What do your students need to know and be able to do to be confident using Google Drive?

What do your students need to know and be able to do to be confident using Google Drive?


Tips and strategies, as well as helpful links to prepare your students to be successful as they start using Google Drive and take full advantage of the benefits

Benefits of Google Drive

Google Drive is a great tool and it's easy to use, but students need to be comfortable and confident for it to be successful. Students can store any file in Google Drive, access them anywhere, share with others, work saves automatically, and they can search for their work.

How to Best Prepare Your Students

However, to take advantage of these benefits, students need to be comfortable with Google Drive. What they need to know will really depend upon the assignment that you want them to do but some basic skills and facts that student should know include the following (I am including a link with a good summary to each):

  1. Understanding sharing settings 
  2. Understanding how to search for and save (organize) files
  3. Basic formatting tips -- the G Suite Learning Center is a great resource, even with printable PDF’s that would be great to put on tables, or hang around the room! I am linking here to the section on Docs. 
  4. How to make a forced copy (this can also be done through Google Classroom
  5. It may help students if you make a template that they can fill in. This takes away a lot of the fear of staring at a blank document. You you could give the option of using a template. Some students will want to be creative but not all. I often make a template with a forced copy link as in #4. Another option is to make a template, as described here
  6. Think about the specific assignment that you want them to do, and what skills will come in most handy.

When and how should I teach these?

I am not a big fan of doing a big intro, but a quick mini lesson, or even a few steps at the beginning of the assignment that will teach and review the necessary skills. These assignment specific skills might include things such as:
  • inserting pictures 
  • formatting 
  • inserting links 
Be patient as students are learning new technology. We often think that they are ‘born with technology in their hands’ and that they already know all of this, but in many cases they do not. They may know some technology skills, but not necessarily the academic ones we are trying to teach them. Work with your students and you may learn something from them too.

Jul 1, 2018

Tips And Tricks For Organization When You Take A Class To The Computer Lab

Organizational Tips and Tricks for Taking a Class to the Computer Lab

Tips And Tricks For Organization When You Take A Class To The Computer Lab

You probably spend quite a bit of time building classroom procedures and routines in your classroom.  But what happens when you take your class out of your classroom?!  A common time is when you take your class to the computer lab.  All of sudden the same students who know the routine in the classroom are unprepared and asking where everything is, or forgot materials in class.

WHAT CAN YOU DO TO PREVENT THIS?

The best solution that I know of is a small box or even a clipboard, or one of the clipboards with space inside.  This allows you, as the teacher, to have one quick thing to grab on the way out of the classroom with everything you and your students will likely need.
I have seen teachers use the top of a box of copy paper, as another handy (and free!) solution.

WHAT SHOULD BE IN YOUR MAGIC BOX?


  • It is, of course, up to your particular situation but here is a good starting point.
  • Class rosters (seating chart if you want them to have assigned seats)
  • A list of important phone numbers (we get one with all the administrators, main office secretary, nurse, counselors, etc.)
  • Blank paper
  • A small case of pencils and pens
  • About 15 or so copies of various puzzles or filler work (in case someone needed to kill time)
  • Extra copies of the assignment.
  • If you want students to be assigned to a certain computer, bring this list.

WHY IS THIS IMPORTANT?

I have seen teachers in absolute chaos because they get to the computer lab and students are asking for another copy of the assignment, or a student shows up late and didn’t get the assignment.  Perhaps a student causes trouble, or has a medical situation, and you don’t have the phone number to call an administrator or nurse!

Teacher friends, these problems are so easily prevented!  Make yourself a supply bag/box/clipboard that you can grab on the way out and make your day in the computer lab go so much more smoothly!
What suggestions do you have to bring with you, or to make sure you stay organized?  I’d love to hear them in the comments, or directly in my email

Jun 17, 2018

Easy Ways to Assess Your Student's Earth Science Knowledge

As we near the end of the year, I want to share with you a new resource that I have been working on. It is a growing bundle of Earth Science Warm Ups or Formative Assessments.

Easy Ways to Assess Your Student's Earth Science Knowledge

I have written quite a bit already on how I use warm ups in my class, and how important I believe formative assessment is, for both the teacher and students. I also have several emails on the topic, so feel free to sign up for my email list, either by clicking here, or the sign up box on this page, if you haven’t already, to be sure you get those.

Some of my formative assessment posts:
With these in mind, I am most of the way through creating a year long set of Earth Science formative assessment task cards. They can be really useful to you for a variety of reasons:

They are aligned to my curriculum guide, and student learning objectives, which are also aligned to New York State.

They are available in different formats:
  • Google Slides to project on the board, if you want to have students record their answers on separate paper.
  • Interactive Google Slides so that students can type directly onto the slide, or move pieces around to answer the prompts.
  • Printable PDF’s so that they can be used as task cards.
  • Instructions are included to use with PowerPoint, and to use with several other digital platforms.
  • These have an emphasis on understanding diagrams and key vocabulary.
  • These work work well as daily warm-ups, tickets out, review activities, task cards, even an early finisher activity. Task cards have so many uses.
  • They are a full year set of 200 task cards, so you can use one every day, or pick and choose how you want to use them and have a big selection. 
I don’t know about you, but it can be hard to consistently come up with questions. It is a huge time saver, and sanity saver to have a bank of questions ready to go. I hope these Earth Science Formative Assessments are helpful to you.

If you have specific questions, or suggestions, please feel free to comment or email me!

Jun 3, 2018

Easy Fitness Tips for Extremely Busy Teachers

Why is fitness so important for teachers?

Fitness is important for everyone, but especially for teachers because we have a very high stress job. Fitness can be a big stress-buster, anti-depressant, enables you to have more energy during the day when working with your kids

On top of stress and depression benefits, we also know that fitness has benefits for our overall health (cholesterol, heart health, blood pressure and more).

Many people know that fitness is important, or want to lose weight but struggle to fit it into their own lives.


My own journey

I have developed some health issues, chronically over the last number of years. I have been diagnosed with what is called myofascial pain, or overly tight muscles, with trigger points and a lot of pain sensitivity. I have had particular trouble in two different areas of my body. Within the last year or two I have really made a commitment to work on them. Exercise and fitness has been a big part of this. I have been through physical therapy, trigger points injections, MRI, acupuncture, and several types of medication. I am not cured, but doing much better.

The end result is that these issues are all muscular, and are places in the body where people are likely to carry stress and tension.

I have had to build in careful types of exercise, both for my muscles directly, and also as part of a plan to better manage stress.

I have tried ‘programs’ and liked them, but they didn’t work well for me. I have had to build off of what I can do, without causing further injury and go slowly.   Then I felt frustrated when I couldn't complete the program.

However, I think it is beneficial because it caused me to really reflect on my goals (less pain), and my own progress (exercising 4-5 days per week, rather than 1-2 is progress, even if not exactly following the program).

As part of my ‘journey’ I have also gotten familiar with biomechanics, and the work of Katy Bowman. She studies how our modern lives (time spent at a computer, or other mostly sedentary lifestyles has affected our bodies, our health, and what we can do about it). One of the main distinctions that she makes is the difference between movement and exercise. I think this distinction is so important for teachers (and others) to keep in mind.

Both are important, and after reading much of her work, I think we need both. However, we have a tendency to discredit the idea of ‘movement’ that is not exercise, and this is a mistake.

Movement v. exercise

Katy Bowman proposes that 30 minutes a day of exercise is not enough to counteract a mostly sedentary day. In her book “Move Your DNA” (affiliate link) she puts out the idea that we do not, necessarily have to do 30-60 minutes of sweaty, strenuous exercise, but that we have to build in more movement throughout our day. This can be large and small. Walking instead of driving, squatting, changing our position, doing more work with our hands rather than machines, etc. Our muscles need constant changing inputs to function at their best. We tend to be in the same positions and same types of movements throughout the day.

Here are a few links that discuss this distinction

What’s the Difference Between Movement and Exercise?

Exercise v. Movement: What’s the Difference?

What are some ways to get more movement into your day

  • Walk more - this might be as simple as parking further away
  • Change how you sit - sit on the floor with your kids. Squat. Sit cross-legged. Sit on a stool. 
  • Carry things in your arms. Instead of using only a backpack, or a rolling crate, try to carry things different ways. 
  • While you are on the phone, walk! 
  • While dinner is cooking, or while brushing your teeth, do some stretches. 
  • Don’t use your food processor, or buy pre-cut veggies, but do the work yourself.
  • When you take your kids to the playground, run and play with them.
  • Build it little movements - arm circles, twists, reaching up, etc. 
  • I’m sure you can come up with many more!! I’d love to hear them!! 

What are some ways to get more exercise into your day?

For me, I am trying to build in more movement, but it didn’t seem like I could get enough within the demands of my job/life. I don’t live in an area where I can walk to a lot of different places, and that is a big difference. So I compromise. I do try to build in more movement, but I also build in exercise. However, I don’t try to overdo it. I don’t stress if every day is not the most strenuous workout. If may not be a program. I try to do one of the following and ‘count it’ as exercise for the day (in no particular order):

  • 30 minutes walk outside, or on the treadmill
  • A 30 minutes exercise video (either Beachbody on Demand, Yoga with Adrienne on YouTube, FemFusion Fitness on YouTube, or FitnessBlender on YouTube)
  • Going outside or to the YMCA to play with my kids, and actively participating
I can often do one of these either in the morning when my kids are getting ready, while dinner is cooking and they are doing their video game time, etc. They are short enough that they are manageable.

As I watch different YouTube channels, and read different books, one of the themes that keeps coming through to me is the idea that movement will make me feel better. Our bodies are designed to have much more movement than we are currently doing. Those movements don’t need to be extreme, but they do need to be occurring on a regular basis. Here is a very current article from the NY Times “Those 2-Minute Walk Breaks? They Add Up”

I hope some of these things helped you reframe the way that you think about exercise, and how you may be able to improve on your exercise and health situation.

Even if you take small steps, they will add up. Find what works for you. But mostly keep moving! Or get moving!

May 20, 2018

Tips for Successful Technology Sub Plans

Tips for Successful Technology Sub Plans when you have to be absent

**This post was written by Science in the City, and previously posted on www.technologytoolsforteachers.com. However, that site has been discontinued, and so my content will gradually be posted here **

Tips for Successful Technology Sub Plans

We’ve all been there – you have to be out for a day, but its nerve-wracking. What to leave for a sub? How to make sure it goes smoothly? You don’t want to waste a day of class, and you don’t want to come back to chaos the next day. Especially at this time of year, there seem to be more field trips, family events, and reasons to be absent.

Here are my suggestions (granted I have mostly taught secondary, but I think these suggestions would work even with upper elementary as well).

You can’t always guarantee who you will get as a sub, or how your students will react, so here are a few suggestions to minimize the stress.

LEAVE THE DIRECTIONS DIRECTLY FOR YOUR STUDENTS

Students are used to receiving direction from you. They are more likely to give a sub a hard time, or the have confusion. Give the directions to the kids. If you use a learning management system such as Google Classroom, Schoology, Edmodo etc this is very easy. they are already used to logging in, and can look for their work there.

If not, I have left the kids a very quick and simple set of directions of what they are to do for the class period, and what is to be handed in at the end of class. I sometimes leave the kids direction in the form of an official looking ‘memo’ with the assignment for the day, when it is due, and what to do if they have extra time. I photocopy either for each student (even a half sheet is plenty), either as a separate handout, or as a cover page with today’s work that explains their directions for the day.

This leaves the sub free to either tell students to login and read the directions, or the pass out directions, as well as take attendance, monitor behavior, and deal with questions and problems, rather than try to teach/lead a lesson that he or she may not be comfortable with. It also takes out the middle man. I don’t know about you, but I have heard some strange stories such as “the sub told us not to hand that in” or the “sub never passed that out, etc”

LEAVE THE SUB PREPARED

Make sure the sub is prepared to do the things that you really need him or her to do. Here are some tips:
  • leave attendance rosters
  • leave a class schedule
  • leave a seating chart, if you use one
  • leave directions and contact information for another teacher to ask in case of questions
  • leave directions or a phone number to call for the main office/security in case of a problem
  • clear directions of what work should be handed in
  • leave some type of feedback form, this helps ensure that you will get feedback on how the day way. There are numerous free versions available by searching for substitute feedback form. Here is a good resource from the National Substitute Teachers Alliance.

HAVE A BACK UP PLAN

As has already been mentioned in many other places, it is important to have a back up plan.

My go to backup plan is either a news article summary or a vocabulary activity. I keep vocabulary lists, and a vocabulary menu of choice activities for students to practice key vocabulary. I also keep a bunch of news articles printed out, with a generic news article response template (I just use the first page). Even if you don’t keep articles, you may be able to get a few copies of the newspaper or of magazines from the school library. Again, there are numerous current events summaries available with a quick search, so I would recommend that you find one appropriate to your students.

These are assignments that students can do for extra credit or early finisher activities but they are also great for emergency sub plans, or if the technology isn’t working. Sometimes there is a sub who isn’t comfortable with the technology or has an issue getting kids logged in. These are a perfect temporary solution.

Tips for Successful Technology Sub Plans when you have to be absent

May 6, 2018

A Financial Secret to Benefit You, Teachers

A Financial Secret to Benefit You, Teachers

As we are just finishing up taxes and tax time, I wanted to share a tax saving or financial tip for teachers that you may not be aware of. I have only become aware in the last few months of a certain type of investment or saving account that is open to teachers and some other public employees. This type of account is called a 457 investment account.

I am not going to claim to be an expert, but I will give you a quick synopsis, and a few more sources of information.

A financial option open to teachers that you may not be aware of
 

I learned about a 457 first on the Choose FI podcast episode entitled The Unfair (FI) Advantage Of Teachers | 457b. Another good source of information is the Millionaire Educator blog, specifically the post “7 Reasons to Love your 457 Plan.”

Definition and Advantages of a 457

A few bullet points about what a 457 is, and what the advantages are:
  • A 457 is pre-tax savings or investment, similar to a 401k (usually in business) or a 403b (often teachers have this as well). That means your money is going in before it's taxed so you are able to put more in and you're able to reduce your taxable income (lower your tax bracket)
  • The rules or a 457 state that you can withdraw when you leave your teaching position, or at age 59.5. This means, if you leave your teaching position, you can withdraw from your 457. 
However, you may need to do some research and work with your HR department. My district did not really seem to publicize the 457 well. I had to do some digging to find out about it. I have heard the same from others as well. However it may be worth the work as it may be a good alternative for you to improve your tax situation and your savings for later.

More information

Here are a few 457 links with some more information
Definitely do your research, they won’t be for everyone, but this has potential to be important enough that I wanted to pass it along. I have been teaching for 12 years, and thought I was relatively on top of my finances, but I had never heard of a 457, and didn’t know it was available. As such, I’m assuming I’m not the only one. This could be a huge advantage if you are teaching but plan to leave your job and stay home with young kids for a while, go back to school, or simply leave the teaching field and pursue a different line of work, but maybe you need some money to tide you over after you leave the position. There is no early withdrawal penalty. You still pay taxes on the money that you withdraw but you don't pay a penalty like you would from any other retirement accounts.

I'd love to hear your comments below. 

Apr 22, 2018

Behind the Scenes at TpT Flock


5 Takeaways from the TpT Flock Regional Conference

I was lucky enough to go to the Teachers Pay Teachers Conference, or Northeast Regional Meet Up called TPT Flock last weekend. It was an inspirational event with many educators who are really changing the face of education and having a huge impact on students, not only in their classroom, but on so many other classrooms in the US and around the world. 

Many of my biggest takeaways apply not only to TPT but also to the classroom of a regular teacher outside of the classroom. I wanted to share some of those takeaways with you.

Details matter, but everything doesn’t have to be perfect

Of course we don't want to make materials for our classroom, or to share professionally, that are full of errors or look messy. However, I think often we try too hard to make something perfect. As we use it it will grow and develop. It's more important sometimes to get something of good quality out (either to our students, or our colleagues) and start using it than it is to keep it on our computer, or in our heads, until it's a hundred percent perfect. Details do matter, but “strive for progress, not perfection.” - Unknown

Don’t try to do it all

This is the biggest thing that I felt like I kept hearing all day: don't try to do it all! This also applies to your classroom! Everybody has their strengths. Maybe you're really good at games and making class fun, or having a sense of humor. Maybe you're really good at connecting with students, or have really innovative and fast ways to grade and assess. Perhaps you are good at building in teachable moments or differentiation, or reading strategies. Maybe you are really good at read alouds and doing demonstrations. There are countless pieces of being a good teacher. No one is good at all of them! Focus on your strengths and build on those! Focus on one thing at a time that you want to learn and improve on, but realize that you do not have to do it all. If you spread yourself too thin you probably won't be successful. Instead, maybe take one unit to try something new, or try one new method at a time.

Collaborate, and reach out for Support

Teaching is often a solitary endeavor, even though we are constantly around people. No one is really in our classroom with us, and we may or may not be in the situation where we plan as a team and really collaborate with other teachers. In my teaching experience there are many times when we're really working alone in our classroom with our students. This is why it's so important to reach out. It could be within your school to to your administrator, to other teachers in your school, or to Facebook groups or discussion boards. Realize that you're not alone! You have things to offer to other people and they may be able to offer you simple solutions in an area that you're struggling

Learning happens when you connect with other people, and with what you already know

Sometimes we think that we're going to learn a bunch of new information on our own by going to a training, reading a book, or seeing something online. In reality there are many times that the best learning happens when we build on what we already know and discuss it with other people! We may see someone doing something just a little bit different than what we're doing, or add on one new twist that makes a big difference. As educators we know that students need a foundation for what they are learning and that they learn best when building on what they know. We often forget this ourselves. It applies to us too! Take what you're doing, talk about it with other people and go just one step further than what you are doing. You might be amazed at the results.

Remember your why

Remember why you became a teacher, and began this journey. Teaching can be a rocky road, and often a draining job. You may have to deal with difficult parents or behavior problems. Think about why you got into this and what were your goals. Maybe you wanted to help students understand the world around them, get them excited about science, help them see that they can be successful or help them grow as young adults. I'm sure you have your own reasons. Take a couple minutes and think about what those reasons are. There have been several times throughout my career when I got to the point where I didn't think that I was wanted to teach anymore. Just as I thought I couldn't take it anymore a something really positive happened. A student had a breakthrough learning moment or came to thank me for something or some other small action happened during the day that made me remember why I come to work every day.

I was lucky enough to go to the conference and meet up with some fantastic teachers from many different states and even Canada I felt honored to be part of that group. However we work with many great educators everyday and we need to remember that and be thankful for each other and for our students.

Apr 1, 2018

Looking to Make Weathering and Erosion more Student-Centered

Making Weathering and Erosion More Student-Centered

Tips, strategies and resources to teach weathering and erosion in a more student-centered, hands-on way.


Weathering and erosion is one of my favorite topics to teach! I get excited every year when that unit comes up. Why? Because it's something that is reallys so visual, and easy to make hands-on. It's happening all the time, all around us, but many kids aren’t aware.

Introduction

I start off with some very quick stations where students look at some pictures, and small examples of weathering, and real life examples similar to weathering (a rusty nail, a tree root that grows and splits a rock, calcium chloride tablets that are put in a jar and shaken to see how they break down, and chalk is put in vinegar to see how it changes and breaks down. At each station they are asked to make some observations, and answer a simple question or two about what happened.

We then re-group and discuss the changes that we saw. We come up with a common definition of weathering. Then we break it down further -- two of these stations that we saw are chemical weathering, and two are physical. What do they have in common? How can we define those? 

Physical and Chemical Weathering

Then we go into weathering in more detail. This is a great place to do lots of shorter labs (such as this weathering lab pack), and practice experimental design skills, and some other basic science skills like graphing changes, writing conclusions, etc.

I do a lab on chemical weathering where students design how to test the effect of acid on weathering rate, using coffee, vinegar, water, and chalk. They have to get their procedures approved before the proceed, but they will need to come up with a way to measure their changes, and write their procedures and conclusions.

Observing chemical weathering changes during a lab

This is a great chance to practice skills such as observation, measuring, and even writing procedures.

For physical weathering we do several small stations on the factors that affect physical weathering (particle size, time, composition). Then they do a summary on these factors, where they have to apply it to a real life situation, and write about it (practice writing and using evidence).

Erosion

Then we move into erosion. This is a great place to integrate high interest activities, because we start off erosion with video clips of avalanches, rivers flooding their banks, etc. Again, we look at what all these have in common to define erosion, and how it is different than weathering. This is memorable for students, and helps them make a connection!

I then structure the erosion part of the unit very similarly. We do a lab on factors that affect stream erosion, and they get to test out things like slope, water velocity, amount of water, collect their data etc. We may do this as a whole group lab, and study stream development.

We also do stations on other types of erosion. I use a big block of ice to simulate a glacier. You can see some great photos and feedback from @teaching_science_irl below. Students at that station compress the ice into a bin of sediments, drag it across, and make observations. Then they draw parallels to the features that are seen on earth with real glaciers and glacial erosion. Similarly, some mixed sediments and a piece of cardboard can simulate erosion by gravity. A hair dryer, or even a straw that students blow on, and some fine sediments can simulate erosion by wind. This allows them to start to see the features, and draw some conclusions. When this is coupled with additional resources, students can really connect!

student making observations during a lab on wind erosion

Here is a picture of wind erosion as students examine which size particles travel farther, and the patterns that they make.

photos from a lab on glacial erosion

Benefits of Teaching this Way

For us weathering and erosion are a real life topic, but for many students who have never travelled and seen these features it can be very abstract. These hands-on activities help to make it more real, and then allow them to make the leap to test questions and other real-life situations

These hands-on activities help make these concepts more real-life, and keep kids engaged. Once they have the foundation and background knowledge, on the topic, they are then much better able to take it the next step and apply to other real life situations or test questions. 

Wrapping Up

Then we do some review and summary. I usually do this on paper, but some of these review activities could be integrated within the unit as stations or activities to break up each section if you are looking for a change from the hands-on. I have this activity where students look at different pictures of weathering, erosion, or deposition, and have to identify which it is. After that, they then have to identify what type of weathering, or what the agent of erosion was.

I also have the students do an activity where they create a concept map of pictures and terms of weathering, erosion, and deposition. This can also, of course, be done with just one of these topics. This is a great way for students to think through the processes, and also for you to really better understand their thinking.

a good way for students to organize and show their knowledge - use of concept maps for weathering and erosion

This is also a good time to have students practice with vocabulary, through either Quizlet, matching terms and definitions, or doing any number of other vocabulary activities.

Sometimes, depending upon the group, I like to have a summative assessment where they are given a situation (an erosional feature, or photos of Cleopatra’s Needle, or cemetery photos and having them explain what they see, in terms of weathering and erosion.

An example of changes due to weathering in different conditions


different weathering of gravestones due to different conditions - a problem to explain

What can you add?  How do you teach like to teach Weathering and Erosion?  

If you are looking for all of my resources together, click here to check them out. 
Tips, strategies and resources to teach weathering and erosion in a more student-centered, hands-on way.
Related Posts Plugin for WordPress, Blogger...