Science in the City

Sep 23, 2018

Formative Assessment Top 5 Round Up

Formative assessment is critical and can be easy!

Formative Assessment is Critical and can be easy

Why is Formative Assesssment Critical?

We often deliver a lesson, class ends, students come in the next day, and we aren’t really sure what they remember, or what they understand.

They come into class the next day, and we are ready to start today’s lesson, but actually the students are not ready to move on.  They are still confused on information from yesterday.

As important as we all know formative assessment can be, it can be tedious to keep coming up with worthwhile questions, in addition to lesson planning and grading.

How can it be Easy?

I can solve that problem for you!

We all know that we have enough on our plates without creating daily assessment questions. However, having the right questions can be really important to get the information that we want.

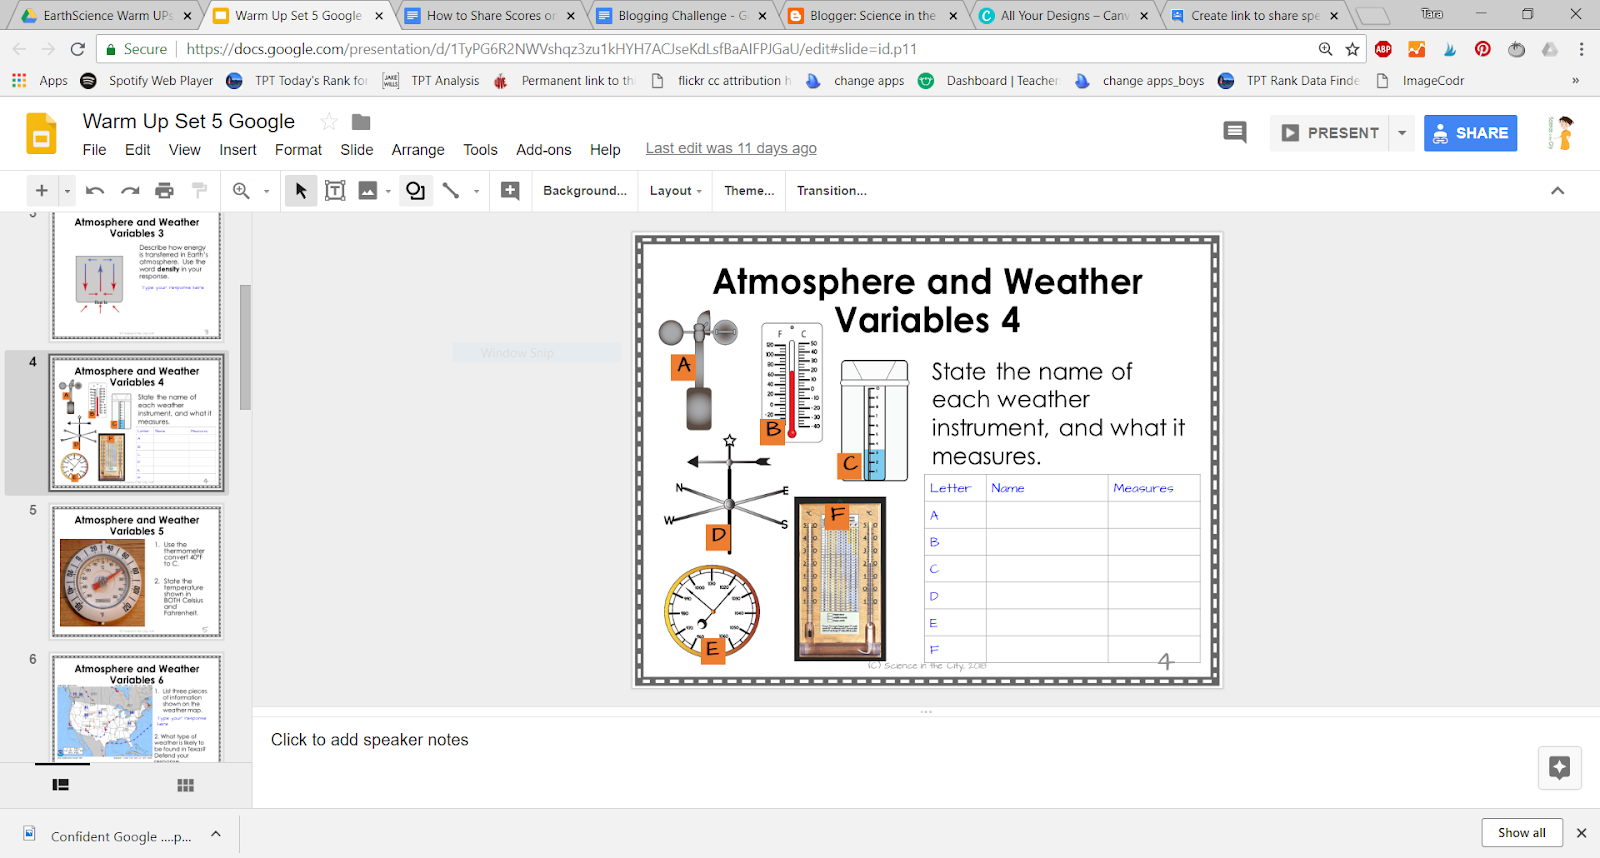
I have created full year bundles of warm ups for Biology and Earth Science.  You can see the questions and preview them in more detail by clicking on the links. 

The Biology set comes in both Google Slides and Google Forms (also includes directions to use in PDF format, or in other Learning Management Systems. The Earth Science Set is only available in Google Slides (with directions for PDF or other LMS; no Google Forms at this time). 

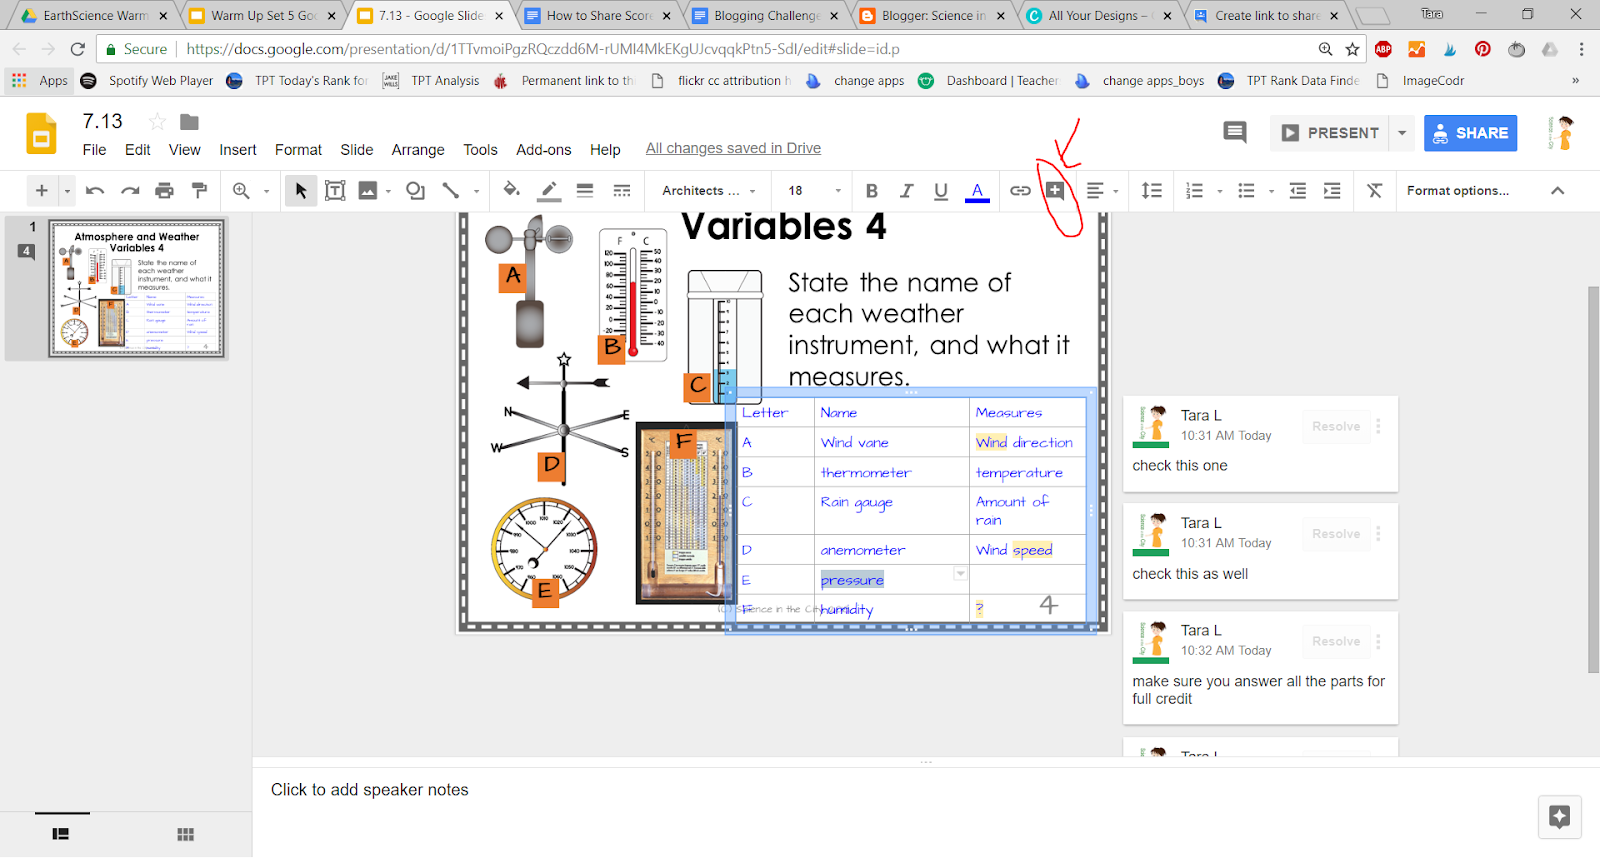
Both include sets for each unit typically taught (13 units for Earth Science and 10 units for Biology), as well as a bonus set with some blank slides/forms, and general formative assessment questions that can be used anywhere you choose.  Each set includes 16-18 slides/forms with generally 2-3 questions each.  They are correlated with learning objectives (Biology and Earth Science), so that all objectives are covered.  Answer keys are included.  Many questions include diagrams, inferencing skills, etc.  There are a range of questions difficulties and styles of questions, allowing you to differentiate for your students. 

This is a topic that I have written about extensively, because I think it is so important.  I also written about other ways that I use these digital task cards, and how and when I use formative assessment.

My top 5 most popular posts on these topics are here:

I hope this answers most of your formative assessment questions.  If not, just comment an ask!!!I hope this answers most of your formative asses

Next time students are entering class you will be able to have a clear understanding of where they are and what they understand before you begin teaching.   I can make that extremely simple for you pull off!  Check out my full year bundles here.


Sep 9, 2018

How to Organize Bellringers or Tickets Out

How to Organize Bellringers or Tickets Out

How to Organize Bellringers or Tickets Out

What are some of the concerns? 

I have been asked about how I organize my bellwork and warm-ups, both in terms of how I organize the papers and the class time. Some of the complaints that I've heard are against doing warm-ups are: too much grading, too much time being spent in class time, wasted for students to settle down, too much shuffling papers and more.

Grading

I have already addressed the grading in a couple of other posts here, here, here, and here.

Timing

As far as the class time I'm really a stickler for using a timer and keeping my bell work very short. I know some people do bell work that's a bit longer, it depends on the length of your class, and how you want to run your class time.  I usually keep it to three to five minutes. My bell work is one two three questions. If it really seems that people are working and need an extra minute or two I make extend it.

I enforce that by using a timer that is visible on the Smartboard. Depending upon how you setup your bellwork there are stand-alone timers, internet timers, Smartboard timers, the 1-click timer Chrome extension and many others.

Paper Organization

As far as how to organize the papers I've done it a few ways. I like to keep all my bellwork questions for a one-unit together in either a Google slide presentation, PowerPoint, Smart Board file, etc. Then I have the students answer on a bellwork or warm up sheet link here.  They turn this in each day.  Before their class, I spread them out on either a back table, counter, or something like that.  On their way in the students can grab the paper with their name on it. It's a little extra incentive for them to get to class early or at least on time because the timer starts when the bell rings.

Electronic Organization

When I have done bellwork electronically I have most often used a Google form. I share the link through Google classroom.  They can quickly click on it answer, and all the answers come to me in one place.  I can also turn the form off when the time is up, so that they have to submit in a timely fashion.  I have also done a Google slide.  In this case, I have all my warm ups in that slide file. I copy just today's slide. share it with them through Google classroom or through a force copy.  They put their answers on it and then submit.  Google Classroom really facilitates this very easily.

Class Time

As far as during class time I can usually make a quick assessment if I want to discuss bellwork or go over it based on what I see when students are working.  If I use a Google form where I can get instant feedback then, I can pull the results up on the board and this can help me assess and decide if I want to have a class discussion. If I find out that I'm wrong it's perfectly okay to go back the next day.

What questions do you still have?  Ask them here and I will do my best to answer!

Aug 26, 2018

Save Time: Streamline Your Earth Science Year

If you are teaching Earth Science and you've never taught it before you may be a bit overwhelmed by how to organize the curriculum. Earth Science here in New York State is a combination of Astronomy, Meteorology and Geology with a little bit of Environmental Science mixed in.

That's a lot of different topics!


How to organize it in a way that makes sense to your students? There really a lot of right answers to that and if you look across districts in New York State, or across the country, you will find a lot of different organization systems, of course. I wanted to share with you the Scope and Sequence and pacing guide that I use to organize my class.


I follow this basic outline for a few reasons.

First of all, I think it's important to focus on some of the topics that we know will be on the New York State lab practical later in the year, closer to the exam. Those points are so critical to students really doing well on the exam. I also like to start out the year bringing in topics where things where we can get students outside for some very simple activities (looking at shadow lengths to study the Sun’s path, build in lots of hands-on lab practice early on). I also sometimes like to look at some news stories about hurricanes (often happening near the start of school), or use this as a chance to practice mapping, and foreshadow some of the topics coming later.

By the time we get to study weather and climate, we may have a storm or two to talk about and make some real-time observations. I also like to intermix, or spiral, the topics so that students see the connections between those topics. There are many other ways to organize Earth Science as well, but this is a system that I found works well. If you are looking for starting point please go ahead and download it. This pacing guide includes some basic objectives and approximate time for each unit it's a good pacing guide you going. Then you can always adapt as you see fit.

If you like this, you may be interested in my more complete Earth Science Curriculum Guide, or other Earth Science Resources that I have.

If you do download my free pacing guide, and it helps you organize and streamline your Earth Science curriculum, I’d love to hear your thoughts, either in the comments, or in our Facebook group!

Aug 12, 2018

Huge Secondary Science Giveaway

Super Science Back To School Giveaway! 

Huge Secondary Science Giveaway August 2018

Welcome Back Science Teachers!!

I hope you are thoroughly enjoying your summer!! I know I am! I can’t believe how quickly summer seems to be wrapping up!

Huge Seondary Science Giveaway August 2018

I know some of you are already back at school, and some of you have a few more weeks still.  Even if you’re not quite ready to go back, a bunch of science teachers over at TeachersPayTeachers want to make the transition back as smooth and easy for you as possible.

Fantastic Science Giveaway! 

We have a fantastic giveaway going just for you, science teacher. We are giving away FOUR $100 TeachersPayTeachers gift cards that you can use to save a lot of time and get some awesome resources for your classroom!

Take a few minutes out of the end of your summer to hop from blog to blog and collect all of our secret words. It will be worth it!! They form a secret sentence.

Once you have the sentence, go to any one of the Group Giveaway Rafflecopter boxes, on any one of our blog pages, and type in the secret sentence in the right order.

We will pick four winners after it ends after midnight on Friday August the 17th.

My Secret Word is #2: “knows”

Another Chance to Win! 

A bunch of us are also hosting our own individual giveaways as well, so make sure you stop by and enter to win! All in all, there will be over $1000 worth of prizes given away this week!

For my individual giveaway I am giving away $25 of resources from my store, Science in the City. You can choose any bundle or set of resources that fits your needs. When entering this giveaway you'll be added to my email list; I send out resources and tips for teachers each week!

MAKE SURE YOU SCROLL DOWN TO ENTER BOTH GIVEAWAYS!!


a Rafflecopter giveaway

Jul 29, 2018

Sharing Feedback on Google Assignments

Sharing Feedback on Google Assignments

When students are doing an assignment in Google Drive one of the difficulties maybe how to best get their scores and feedback to them. This is especially true if you are doing a series of smaller assignments, such as warm ups.


A few general ways

There are a few general ways to do this and I will give you some tips on each one. 

  1. Use a learning management system, such as Google Classroom (probably the easiest), Schoology or many others. 
  2. Give them feedback directly on the document using the comment tool 
  3. Create a spreadsheet or PDF document that lists grades by ID number. There are pros and cons of each of these of course.

In Google Classroom

In Google Classroom it can be pretty self explanatory to grade an assignment there, and give feedback. Then those grades will likely have to be entered into your gradebook, unless your school has a way of importing them.

Sharing a Single Slide and Giving Feedback

I have sets of warm-ups that are a set of Google slides that cover the whole unit. For example, here is a set that I have on weather.


If I want to share only one slide with a student that day, I would do the following steps:
  • Copy that slide to a new presentation
  • I would share with them through either Google Classroom, or by creating a force copy link. 
  • You can see what the student sees by clicking here.
  • The student then can type directly into the slide, and then either submit through Google Classroom, or share back with me. For me to be able to comment, they must share with either ‘can comment’ or ‘can edit’
  • It then becomes very easy to comment on their work, from my computer. More information on using comments for student feedback is available here.


If I do it this way, I often keep a piece of scrap paper next to me to record their grades, or another window open to record grades as I go through, if I am not using Google Classroom.

Google Forms and a Spreadsheet

I discussed how I use Google Forms and create a spreadsheet by ID number in this post.

Other Tools and Tips

There are other tools as well, which I will touch on just briefly.
  • If you are often entering repetitive feedback, and want to have a bank of comments, feedback, and even stickers that you can use, take a look at this article on using Google Keep for Quick Student Feedback

  • If you (or your students) would find it helpful to give spoken feedback, look into the Kazienza app. It is a very simple Google Chrome app that enables verbal feedback.

  • Only in Google Docs (not Slides, etc), there are several tools for rubrics, which can also simplify the process of grading and giving feedback to students. This can also be done within Google Classroom. And lastly, one more Google Classroom rubric hack.

I hope that these tools help make your digital transition a bit easier, as you find more effective ways to manage your grading and give feedback to your students.


Jul 15, 2018

What do your students need to know and be able to do to be confident using Google Drive?

What do your students need to know and be able to do to be confident using Google Drive?


Tips and strategies, as well as helpful links to prepare your students to be successful as they start using Google Drive and take full advantage of the benefits

Benefits of Google Drive

Google Drive is a great tool and it's easy to use, but students need to be comfortable and confident for it to be successful. Students can store any file in Google Drive, access them anywhere, share with others, work saves automatically, and they can search for their work.

How to Best Prepare Your Students

However, to take advantage of these benefits, students need to be comfortable with Google Drive. What they need to know will really depend upon the assignment that you want them to do but some basic skills and facts that student should know include the following (I am including a link with a good summary to each):

  1. Understanding sharing settings 
  2. Understanding how to search for and save (organize) files
  3. Basic formatting tips -- the G Suite Learning Center is a great resource, even with printable PDF’s that would be great to put on tables, or hang around the room! I am linking here to the section on Docs. 
  4. How to make a forced copy (this can also be done through Google Classroom
  5. It may help students if you make a template that they can fill in. This takes away a lot of the fear of staring at a blank document. You you could give the option of using a template. Some students will want to be creative but not all. I often make a template with a forced copy link as in #4. Another option is to make a template, as described here
  6. Think about the specific assignment that you want them to do, and what skills will come in most handy.

When and how should I teach these?

I am not a big fan of doing a big intro, but a quick mini lesson, or even a few steps at the beginning of the assignment that will teach and review the necessary skills. These assignment specific skills might include things such as:
  • inserting pictures 
  • formatting 
  • inserting links 
Be patient as students are learning new technology. We often think that they are ‘born with technology in their hands’ and that they already know all of this, but in many cases they do not. They may know some technology skills, but not necessarily the academic ones we are trying to teach them. Work with your students and you may learn something from them too.

Jul 1, 2018

Tips And Tricks For Organization When You Take A Class To The Computer Lab

Organizational Tips and Tricks for Taking a Class to the Computer Lab

Tips And Tricks For Organization When You Take A Class To The Computer Lab

You probably spend quite a bit of time building classroom procedures and routines in your classroom.  But what happens when you take your class out of your classroom?!  A common time is when you take your class to the computer lab.  All of sudden the same students who know the routine in the classroom are unprepared and asking where everything is, or forgot materials in class.

WHAT CAN YOU DO TO PREVENT THIS?

The best solution that I know of is a small box or even a clipboard, or one of the clipboards with space inside.  This allows you, as the teacher, to have one quick thing to grab on the way out of the classroom with everything you and your students will likely need.
I have seen teachers use the top of a box of copy paper, as another handy (and free!) solution.

WHAT SHOULD BE IN YOUR MAGIC BOX?


  • It is, of course, up to your particular situation but here is a good starting point.
  • Class rosters (seating chart if you want them to have assigned seats)
  • A list of important phone numbers (we get one with all the administrators, main office secretary, nurse, counselors, etc.)
  • Blank paper
  • A small case of pencils and pens
  • About 15 or so copies of various puzzles or filler work (in case someone needed to kill time)
  • Extra copies of the assignment.
  • If you want students to be assigned to a certain computer, bring this list.

WHY IS THIS IMPORTANT?

I have seen teachers in absolute chaos because they get to the computer lab and students are asking for another copy of the assignment, or a student shows up late and didn’t get the assignment.  Perhaps a student causes trouble, or has a medical situation, and you don’t have the phone number to call an administrator or nurse!

Teacher friends, these problems are so easily prevented!  Make yourself a supply bag/box/clipboard that you can grab on the way out and make your day in the computer lab go so much more smoothly!
What suggestions do you have to bring with you, or to make sure you stay organized?  I’d love to hear them in the comments, or directly in my email

Related Posts Plugin for WordPress, Blogger...